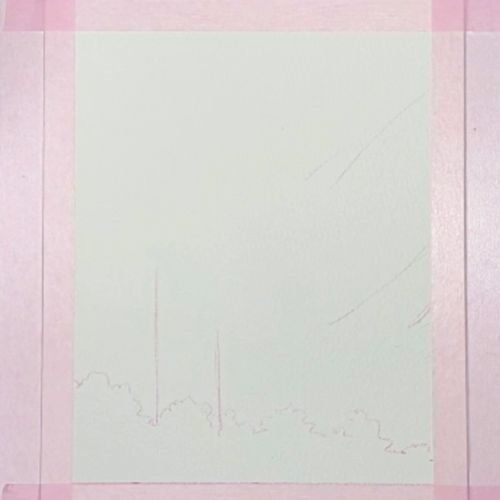
pink sunset silhouette Watercolor Skylines

Disclosure: This post contains affiliate links, meaning if you make a purchase via the links, we will earn a commission at no additional cost to you. Please read the full disclosure.

Disclosure: This post contains affiliate links, meaning if you make a purchase via the links, we will earn a commission at no additional cost to you. Please read the full disclosure.

watercolor

Materials needed for the tutorial

Before we begin, let’s gather the essential materials you’ll need for this watercolor tutorial:

With these materials at hand, you’ll be well-equipped to embark on your watercolor skyline painting journey.

Watercolor skyline paintings are a captivating way to capture the essence of a city’s skyline. These vibrant artworks beautifully blend the architectural wonders with the ever-changing hues of the sky, creating a mesmerizing visual experience. Whether you’re an experienced artist or a novice looking to explore the world of watercolors, this tutorial will guide you through the process of creating your very own pink sunset silhouette skyline masterpiece.


In this comprehensive guide, we’ll delve into the art of watercolor skyline painting, exploring techniques, color theory, and composition. By following the step-by-step instructions, you’ll learn how to sketch the skyline silhouette, choose the perfect colors for the sunset, paint the sky with a gradient effect, add buildings and landmarks, create a reflection on the water, and finally, add those finishing touches that bring your artwork to life.

watercolor

Step 1

Sketching the skyline silhouette: Sketch the silhouettes of these structures along the horizon line, paying close attention to their shapes, heights, and relative positions.
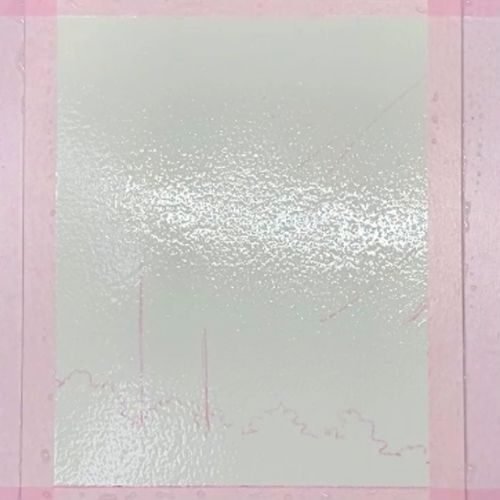
watercolor

Step 2

Wet the Paper: Using a clean brush, wet the whole paper where you'll paint the sunset sky. This will help the colors blend seamlessly.
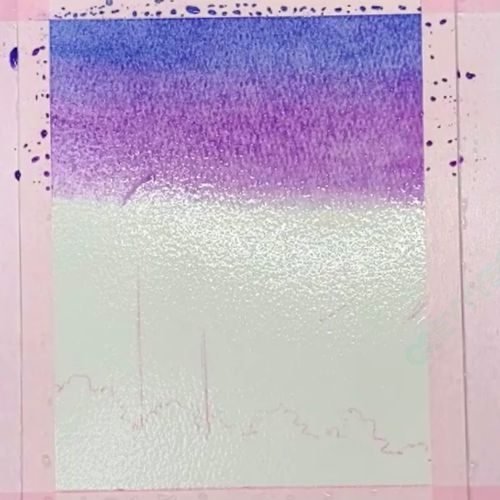
watercolor

Step 3

paint the sky: For a pink sunset, start with a warm base color like red violet or alizarin crimson. These colors will provide the foundation for your sunset hues.

watercolor

Step 4

finish painting the sky: Mix in shades of pink to add depth and warmth to your sunset. Incorporate touches of purple, such as permanent rose or dioxazine purple, to create the beautiful pink tones that define a stunning sunset.
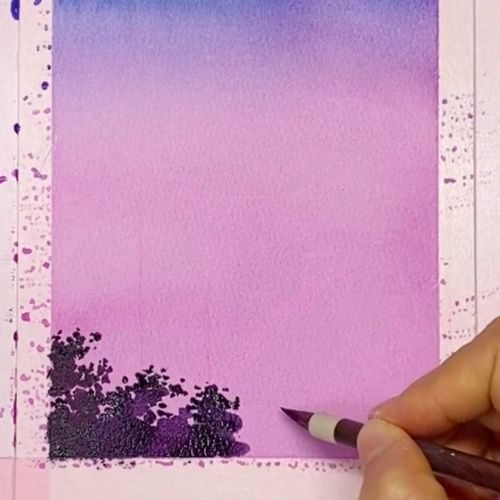
watercolor

Step 5

Paint the trees: Using a small round brush and a dark color (such as burnt umber or dark purple), paint the silhouette of bush leaves.

watercolor

Step 6

Paint the silhouette of tree leaves: Using a mid-sized round brush and the same color, carefully paint the tree leaves on the top right area.

watercolor

Step 7

Adding the buildings and landmarks: Using a small liner and a dark color, carefully paint along the silhouette lines of the poles.

watercolor

Step 8

Finish the painting of the silhouette: Pay close attention to the shapes and proportions of each structure, ensuring that they are accurately represented.

watercolor

Step 9

Add birds in the sky: If desired, you can add small details like birds, adding a sense of scale and life to your painting.

Step 10

Add moon and stars: Use a white gel pen or opaque white paint to add a moon. Experiment with splattering or flicking paint onto the sky to create a sense of texture and movement.

Tips and tricks for watercolor skyline paintings

As you embark on your watercolor skyline painting journey, keep these tips and tricks in mind to enhance your skills and achieve stunning results:

  • Practice your brushstrokes and color mixing on separate sheets of watercolor paper before starting your painting.
  • Experiment with different brush sizes and shapes to create varied textures and effects.
  • Use a clean, damp brush to soften edges and blend colors seamlessly.
  • Consider using masking fluid to reserve white areas or create crisp lines and shapes.
  • Embrace the unpredictability of watercolors and let the paint flow and blend naturally.
  • Observe and study the colors and lighting of actual sunsets to capture their essence in your painting.
  • Don’t be afraid to let your creativity shine through and add personal touches to your artwork.

Conclusion and final thoughts

Watercolor skyline paintings offer a unique and captivating way to capture the essence of a city’s skyline. By following this step-by-step tutorial, you’ve learned how to sketch the silhouette, choose the perfect colors for a pink sunset, paint the sky with a gradient effect, add buildings and landmarks, create a reflection on the water, and add those final touches that bring your artwork to life.


Remember, the journey of creating a watercolor skyline painting is just as rewarding as the final product. Embrace the process, experiment with different techniques, and let your creativity flow. With practice and dedication, you’ll be able to create breathtaking watercolor skyline masterpieces that capture the beauty and vibrancy of your favorite cities.


If you’re inspired to create your own watercolor skyline painting after following this tutorial, I invite you to share your artwork with me. I’d love to see your interpretation of a pink sunset silhouette skyline and offer any additional tips or guidance. Join our community of watercolor enthusiasts and let’s celebrate the beauty of this captivating art form together.

Trending Posts

Follow Us

Welcome to Bujoart, where creativity knows no bounds! At Bujoart, we believe that art is not just a skill, but a form of expression. Whether you’re a seasoned artist or just starting out on your creative adventure, we have something for everyone.

Popular Articles
Newsletter
Subscribe for more!
Categories
Instagram
Facebook Group
Edit Template