Understanding lighting in face drawing goes beyond simply adding highlights and shadows. It’s about comprehending how light behaves when it encounters different facial structures, skin textures, and angles. This knowledge allows you to create a three-dimensional illusion on a two-dimensional surface, giving your portraits a sense of volume and presence.
Moreover, lighting plays a crucial role in setting the mood and atmosphere of your artwork. The direction, intensity, and color of light can dramatically alter the perception of your subject. Soft, diffused lighting can create a gentle, dreamy ambiance, while harsh, directional lighting can evoke drama and intensity. By harnessing these lighting principles, you can guide the viewer’s eye and emphasize specific facial features, ultimately telling a more compelling visual story through your drawings.
The Basics of Light and Shadow on the Face
To excel in face lighting drawing, you must first grasp the fundamental principles of how light interacts with the human face. The key elements to consider are:
- Light Source: The position and intensity of the light source determine where highlights and shadows fall on the face.
- Form Shadows: These are the areas of the face that naturally fall into shadow due to their shape and position relative to the light source.
- Cast Shadows: These are shadows created when one part of the face blocks light from reaching another area.
- Reflected Light: This occurs when light bounces off nearby surfaces and illuminates shadowed areas.
- Highlights: The brightest areas where light directly hits the face, often on prominent features like the nose, cheekbones, and forehead.
Understanding these elements allows you to create a convincing illusion of three-dimensionality in your drawings. Start by identifying the main light source and mentally mapping out where the highlights and shadows should fall. Remember that the face is not a flat surface but a complex structure with various planes and curves.
When rendering shadows, consider their intensity and softness. Shadows closer to the light source tend to have harder edges, while those further away become softer and more diffused. Pay attention to how shadows wrap around the contours of the face, following the underlying bone structure and muscle forms.
Different Types of Lighting for Face Drawing
Experimenting with various lighting setups can dramatically enhance your face drawing skills. Here are some common lighting scenarios to explore:
Frontal Lighting:
- Light source directly in front of the subject
- Minimizes shadows, resulting in a flatter appearance
- Useful for clear, detailed portraits but can lack depth
Side Lighting:
- Light source positioned to one side of the subject
- Creates strong contrasts and emphasizes facial contours
- Excellent for dramatic portraits and showcasing facial structure
Three-Quarter Lighting:
- Light source at a 45-degree angle to the subject
- Balances highlights and shadows for a natural, flattering look
- Popular in portrait photography and drawing
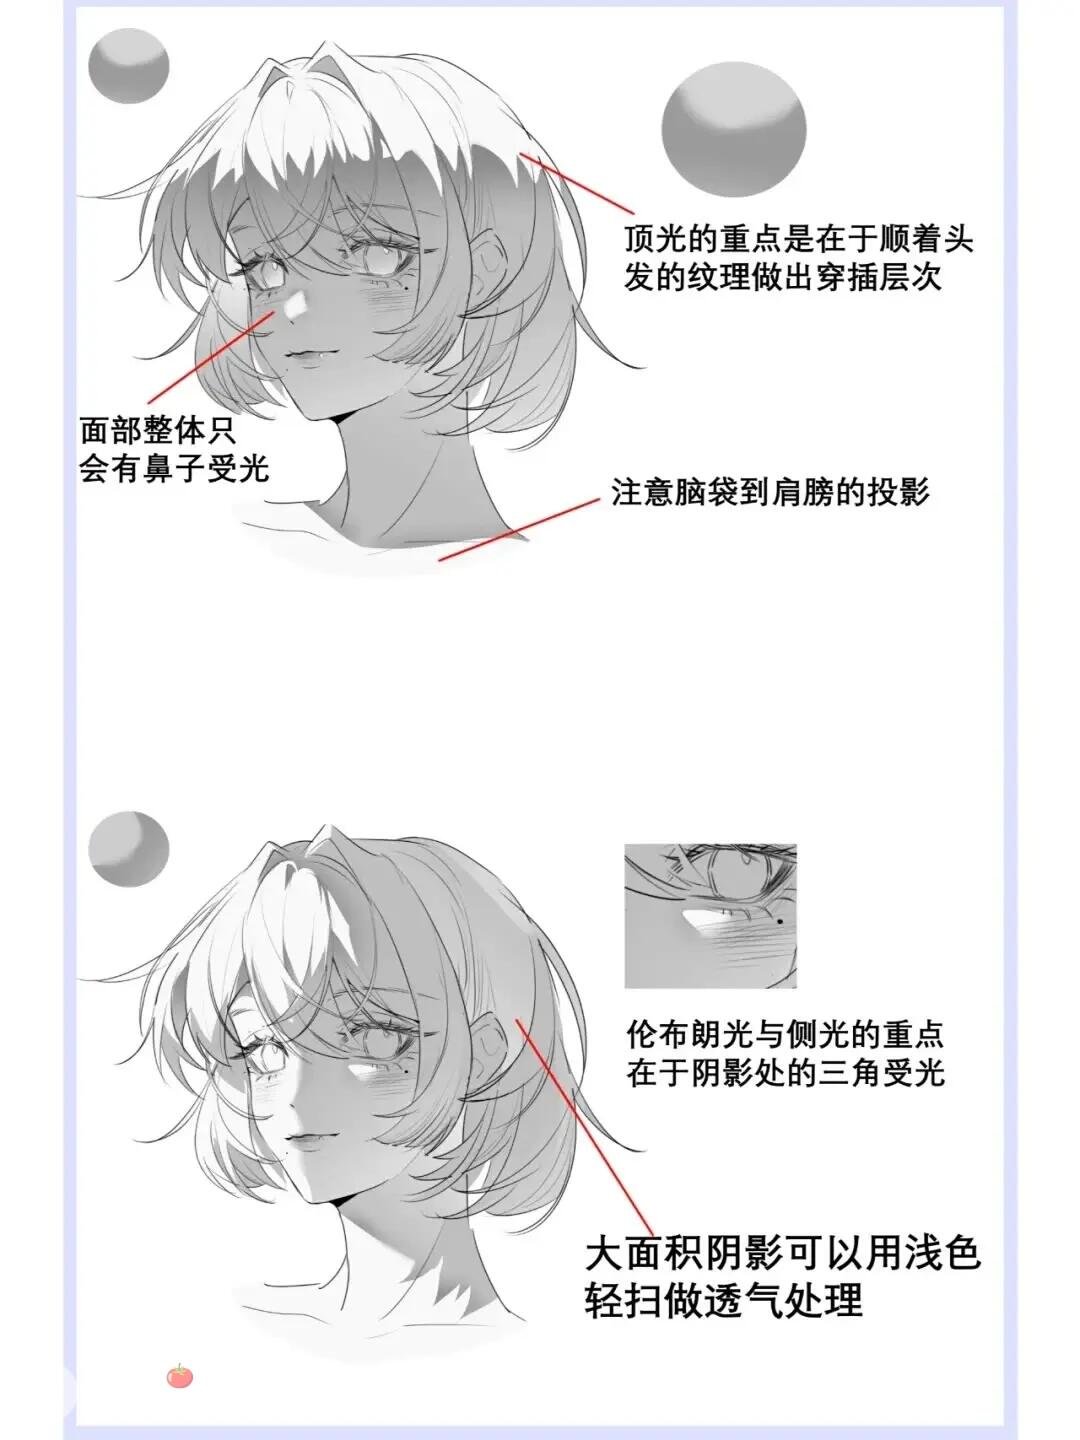
Rembrandt Lighting:
- A specific type of side lighting
- Creates a triangular highlight on the cheek opposite the light source
- Adds depth and drama to portraits
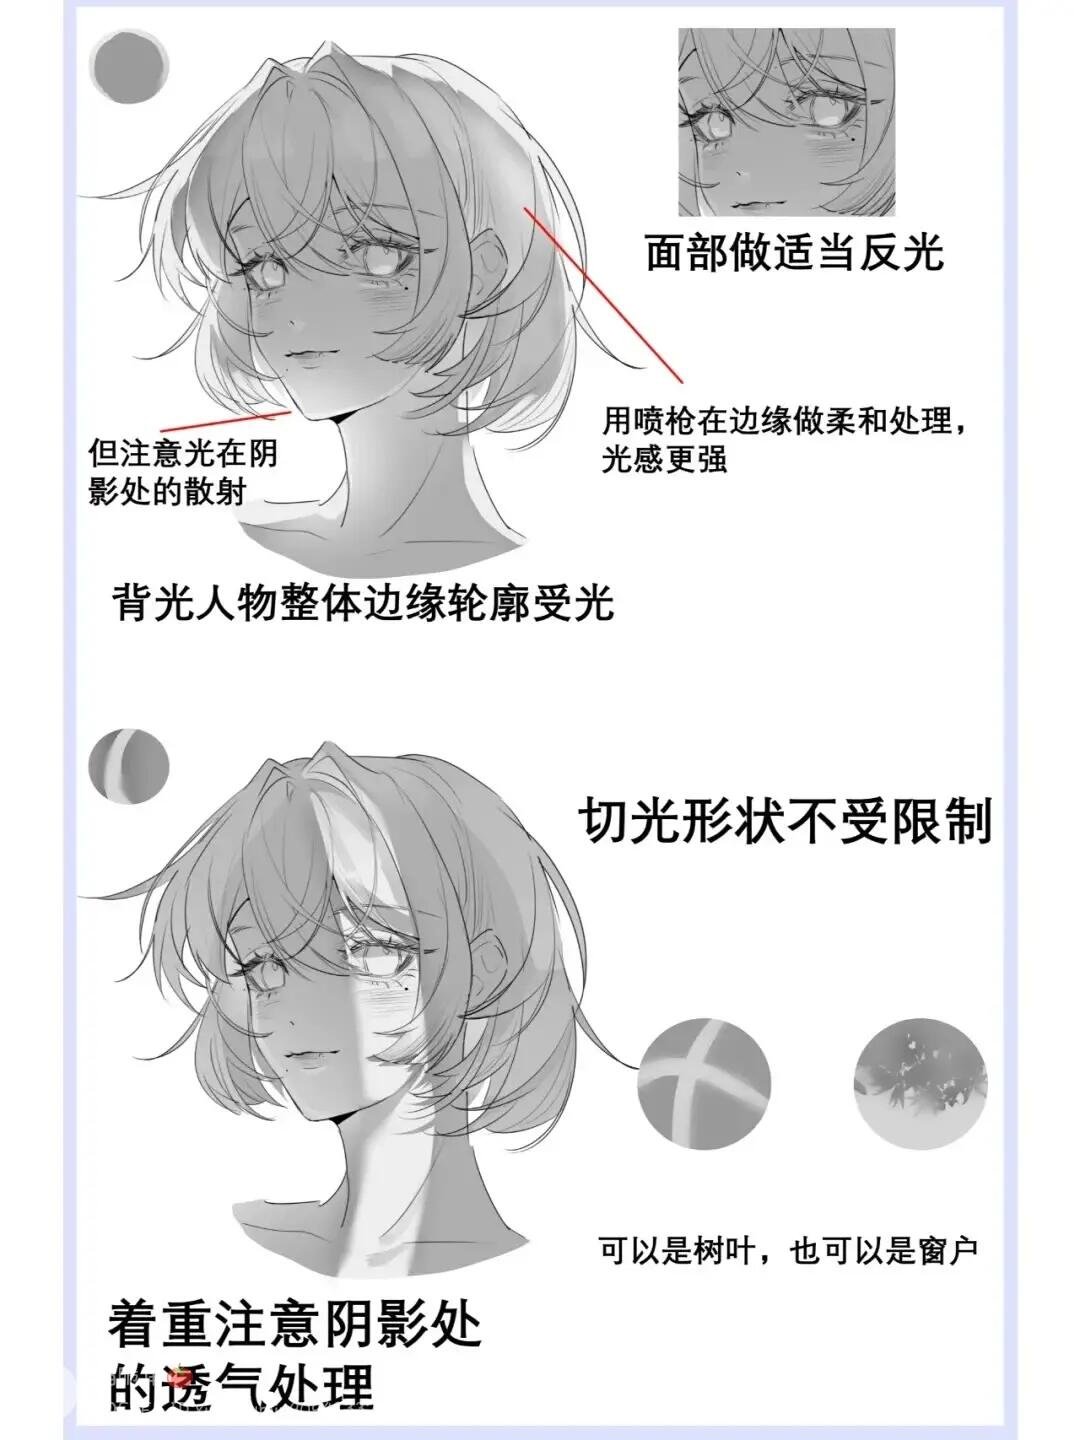
Rim Lighting:
- Light source positioned behind the subject
- Creates a glowing outline around the face
- Useful for silhouettes and atmospheric portraits

Credit: Seesaw
Common Mistakes to Avoid in Face Lighting Drawing
As you delve into the world of face lighting drawing, be aware of these common pitfalls:
Inconsistent Light Source: Ensure that all shadows and highlights correspond to a single, consistent light source. Mixing lighting directions can result in a confusing and unrealistic portrait.
Overuse of Hard Edges: While some areas may have sharp shadow edges, most facial shadows have soft transitions. Avoid using hard lines for all shadow boundaries, as this can make the face appear unnatural.
Neglecting Reflected Light: Don’t forget to include subtle reflected light in shadowed areas. This adds depth and prevents shadows from appearing too flat or dark.
Ignoring Facial Planes: The face is composed of various planes that interact differently with light. Failing to consider these planes can result in a lack of dimensionality in your drawings.
Overlooking Subsurface Scattering: Human skin is slightly translucent, allowing some light to pass through. This effect, known as subsurface scattering, softens shadows and adds a subtle glow to skin tones.
To avoid these mistakes, constantly observe real-life subjects or reference photos. Pay close attention to how light behaves on different facial features and practice replicating these effects in your drawings.

Credit: Seesaw
Practicing Face Lighting: Exercises and Challenges
Improving your face lighting drawing skills requires consistent practice and experimentation. Here are some exercises and challenges to help you hone your abilities:
Sphere Studies:
- Draw a series of spheres under different lighting conditions
- Practice rendering highlights, core shadows, and reflected light
- This simple exercise helps you understand how light behaves on curved surfaces
Single Feature Focus:
- Choose one facial feature (e.g., nose, eye, or ear) and draw it under various lighting scenarios
- This allows you to concentrate on how light affects specific facial structures
Self-Portrait Series:
- Create a series of self-portraits using different lighting setups
- Use a mirror or take photos of yourself under various lighting conditions
- This exercise helps you understand how lighting changes the appearance of familiar features
Timed Sketches:
- Set a timer for 5-10 minutes and quickly sketch faces with different lighting
- Focus on capturing the essential light and shadow patterns rather than details
- This improves your ability to quickly analyze and render lighting effects
Mood Lighting Challenge:
- Draw the same face multiple times, altering the lighting to convey different moods or emotions
- Experiment with dramatic shadows, soft glows, and unusual light sources
- This exercise demonstrates how lighting can impact the emotional impact of a portrait
By regularly engaging in these exercises, you’ll develop a more intuitive understanding of face lighting drawing techniques. Remember to analyze your work critically and seek feedback from other artists to continually improve your skills.
Investing in these tools and resources can significantly accelerate your learning process and provide you with valuable references for your face lighting drawing practice.
Ready to take your face lighting drawing skills to the next level? Challenge yourself to create a series of portraits using different lighting techniques discussed in this article. Share your progress on social media using the hashtag #FaceLightingChallenge and connect with other artists for feedback and inspiration. Remember, mastering face lighting drawing is a journey – embrace the process and keep practicing!
By dedicating time to understanding and practicing face lighting drawing techniques, you’ll develop a keen eye for how light shapes and defines the human face. This skill will not only improve your portrait drawings but also enhance your overall artistic abilities. Keep experimenting, observing, and creating, and watch as your portraits come to life with the power of light and shadow.