Conclusion: Taking Your Clothes Drawing to the Next Level
As we wrap up this comprehensive guide to clothes drawing, I hope you feel inspired and equipped with new techniques to enhance your artwork. Remember, mastering the art of drawing clothing is a journey that requires patience, practice, and persistence.
To continue improving your skills, consider the following steps:
- Create a dedicated sketchbook for clothes drawing exercises
- Challenge yourself with daily or weekly drawing prompts focused on different garments or styles
- Join online communities or local art groups to share your work and learn from others
- Attend life drawing sessions to improve your understanding of how clothing interacts with the human form
- Experiment with combining traditional and digital techniques to expand your artistic toolkit
Most importantly, don’t be afraid to push boundaries and try new approaches. The world of fashion and clothing design is constantly evolving, and your art can evolve with it.
Ready to take your clothes drawing skills to new heights? Join our online workshop series, where professional illustrators and fashion designers share their secrets and techniques. Sign up now and receive a free digital art supplies kit to jumpstart your journey into advanced clothes drawing!
By dedicating time and effort to honing your clothes drawing techniques, you’ll not only improve your artistic skills but also open up new opportunities in fields like fashion design, character creation, and illustration. So grab your pencil (or stylus), and let your creativity flow through the fabric of your imagination!
Clothes Drawing Techniques: Tips for Creating Realistic and Stylish Designs
As an artist passionate about fashion illustration and character design, I’ve spent years honing my skills in clothes drawing. In this comprehensive guide, I’ll share my expertise and techniques to help you elevate your clothing illustrations to new heights. Whether you’re a beginner or an experienced artist looking to refine your skills, this article will provide valuable insights into creating realistic and stylish clothing designs.
Introduction to Clothes Drawing: Why It Matters
Clothes drawing is an essential skill for any artist working in fashion, character design, or illustration. The ability to render garments accurately and stylishly can make or break a design, bringing characters to life and adding depth to your artwork. As someone who has worked on numerous projects requiring detailed clothing illustrations, I can attest to the importance of mastering this skill.
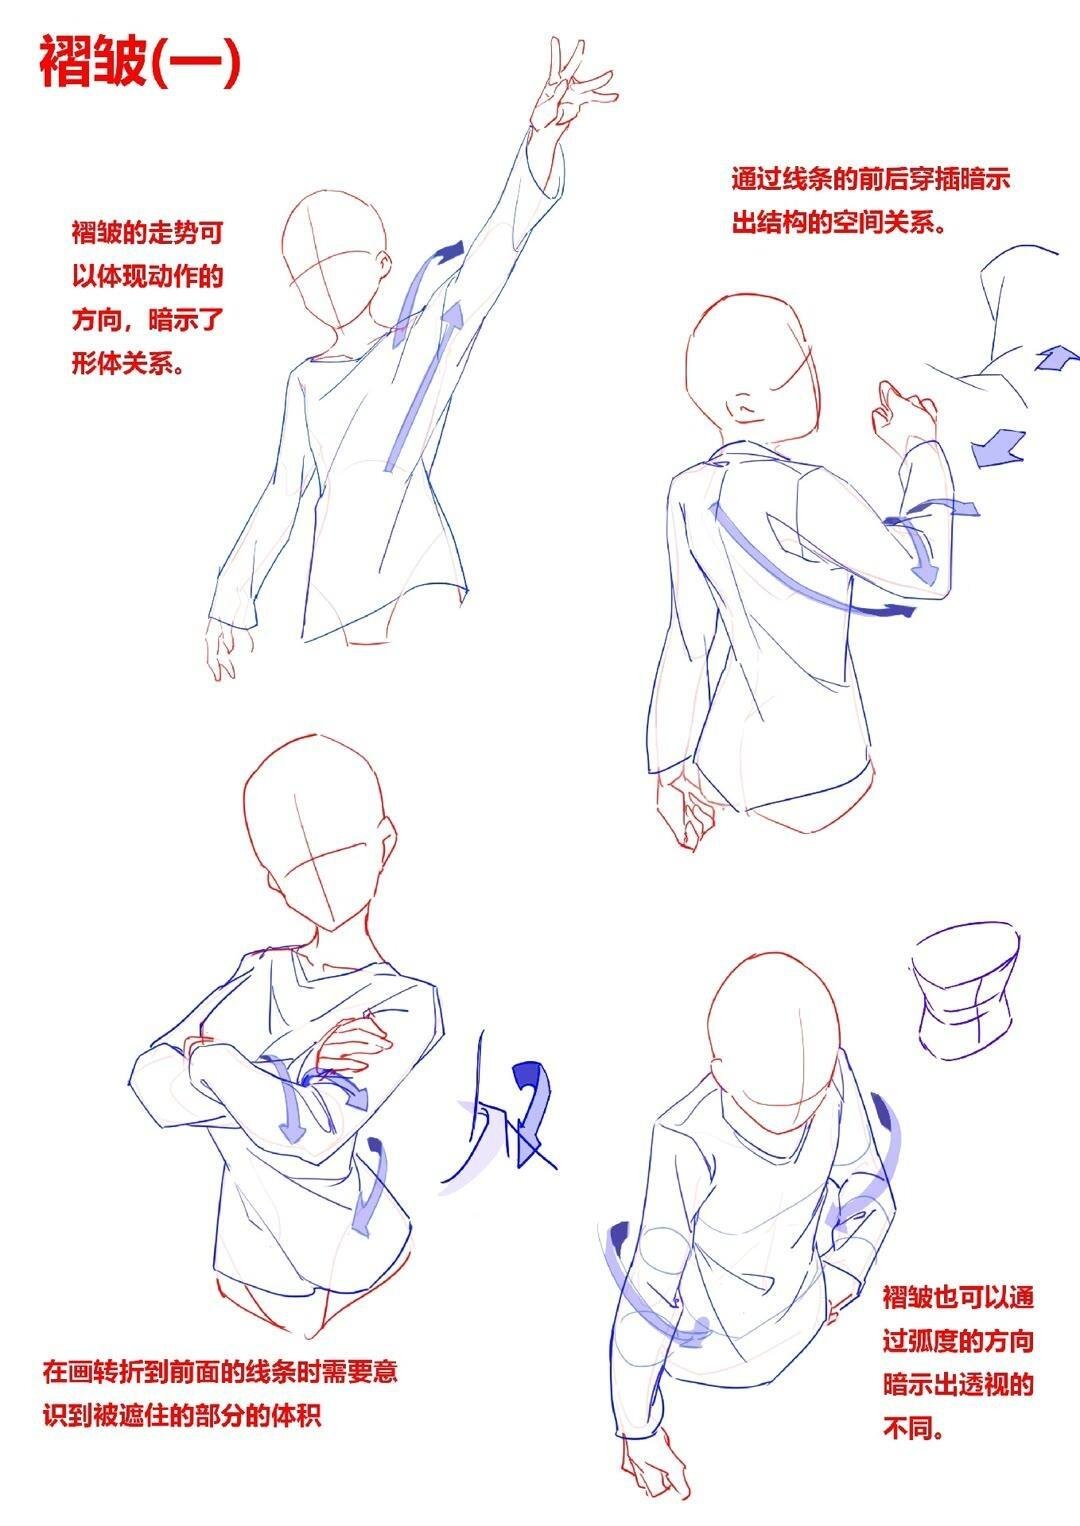
When we draw clothes, we’re not just depicting fabric; we’re telling a story. The way a garment drapes, folds, and moves can convey a character’s personality, social status, and even their emotional state. A well-executed clothes drawing can elevate a simple sketch to a compelling narrative.
Moreover, clothes drawing is a versatile skill that applies to various artistic fields. Whether you’re designing costumes for a theater production, creating concept art for a video game, or illustrating a fashion magazine, the ability to draw clothes accurately and creatively is invaluable.
Understanding Fabric and Texture in Clothes Drawing
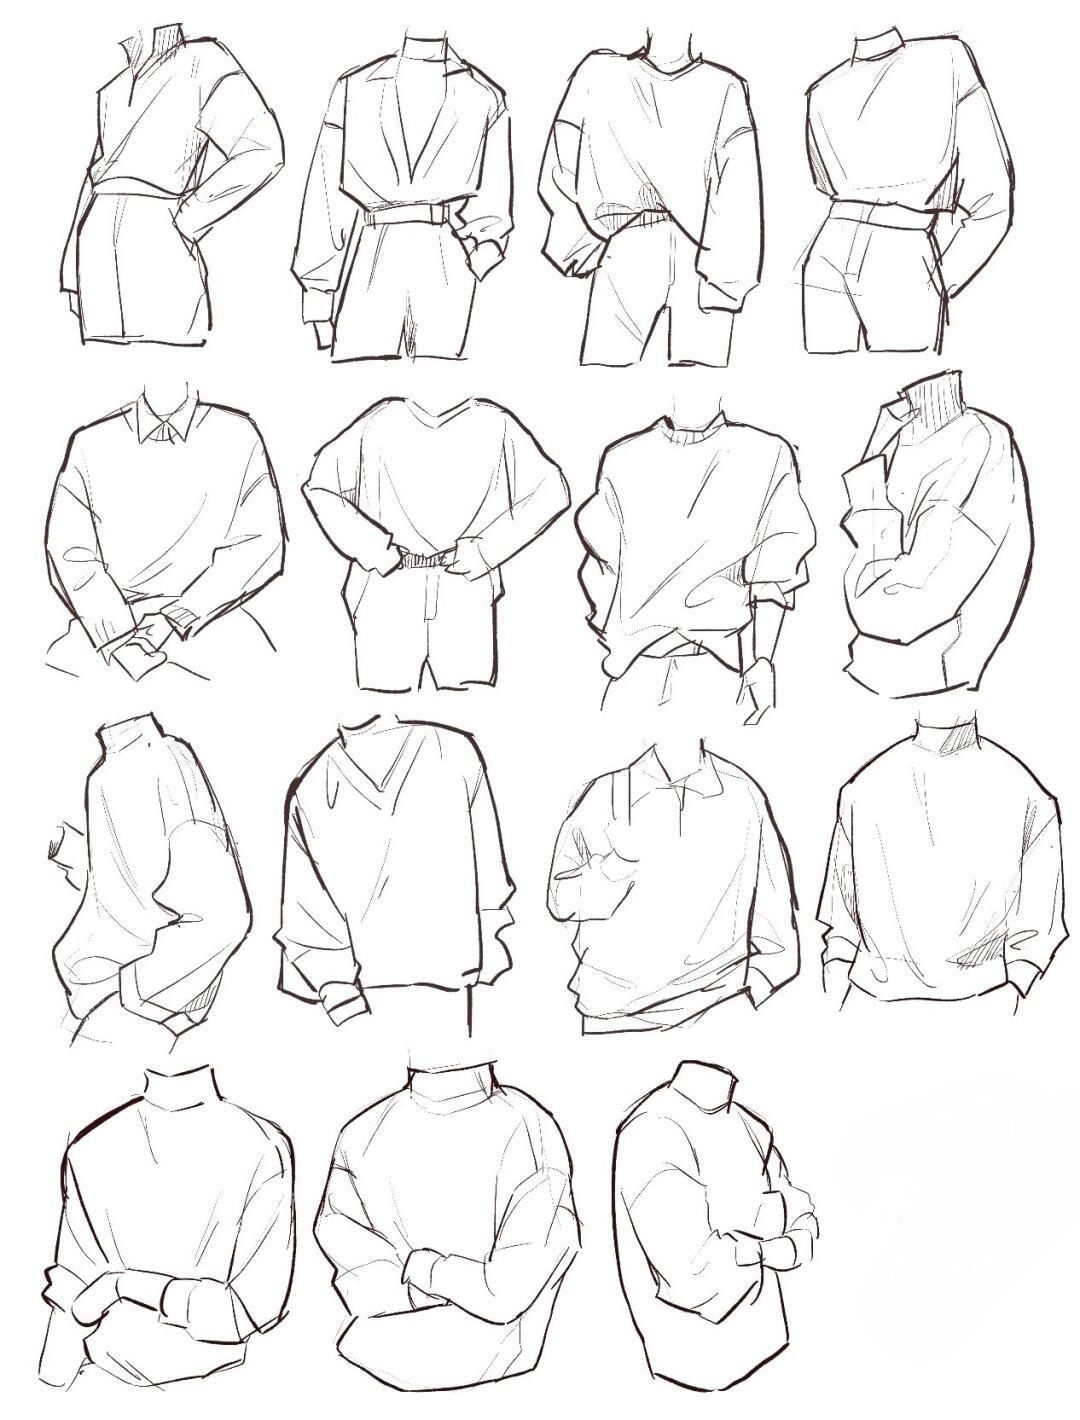
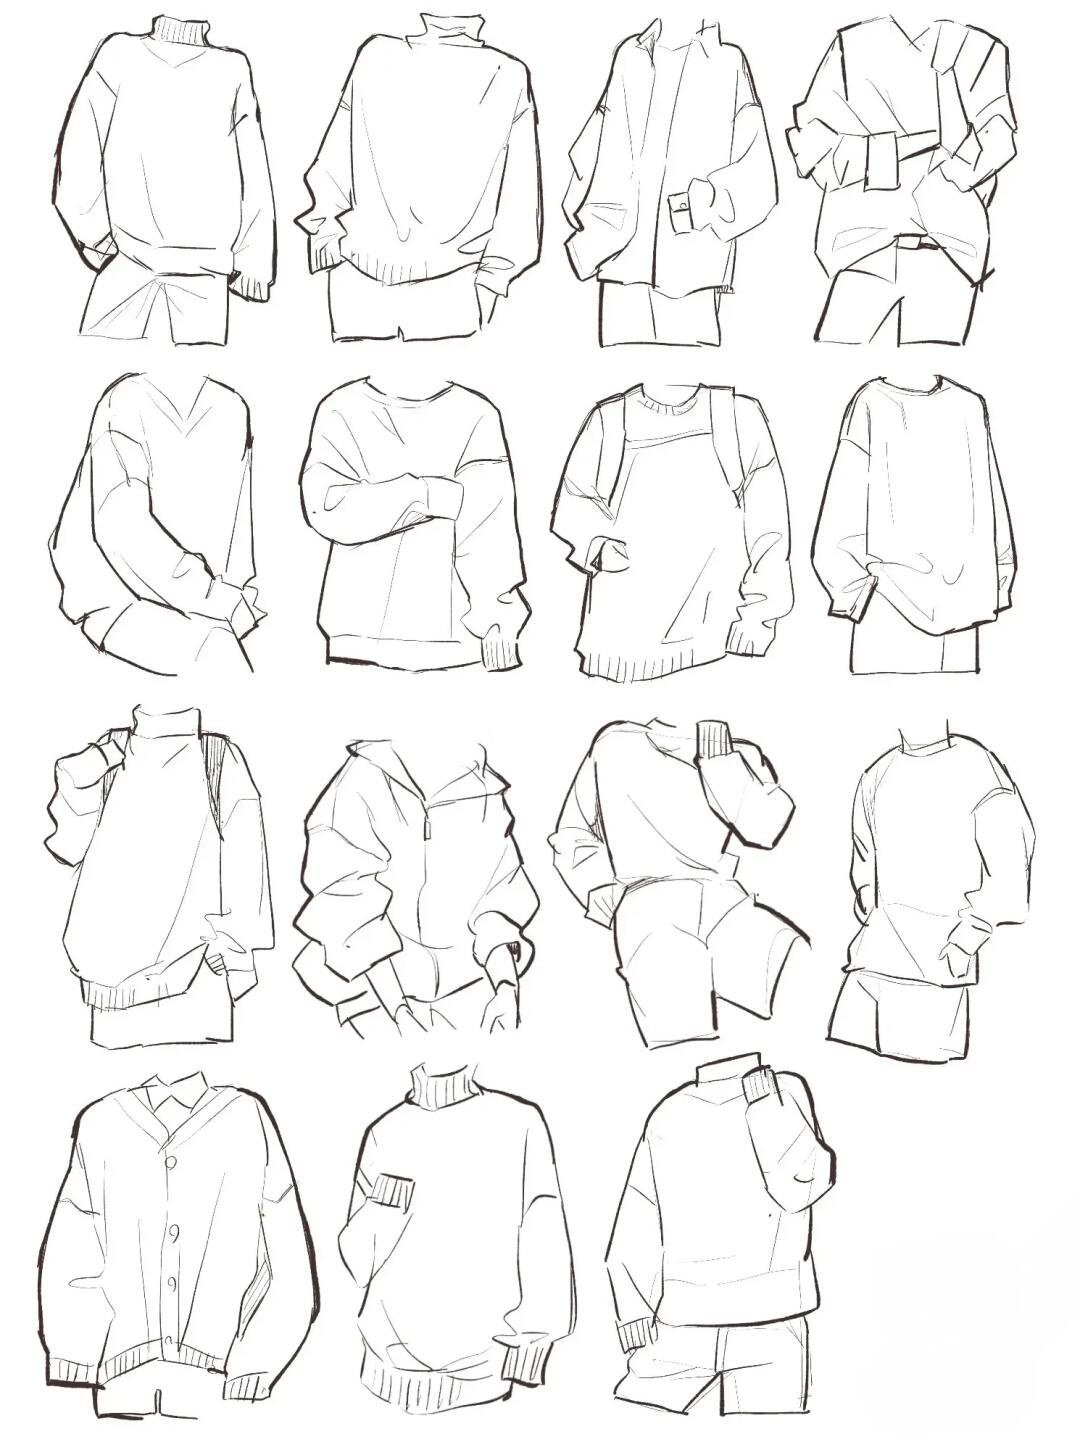
One of the most crucial aspects of clothes drawing is understanding how different fabrics behave and how to represent their textures visually. Each material has its unique properties that affect how it drapes, folds, and reflects light. As an artist, it’s essential to familiarize yourself with these characteristics to create convincing clothing illustrations.
Here’s a quick reference guide to some common fabric types and their properties:
Fabric Type | Characteristics | Drawing Techniques |
---|---|---|
Cotton | Soft, lightweight, prone to wrinkling | Use soft, rounded folds and subtle texturing |
Silk | Smooth, lustrous, flowing | Emphasize shine and fluid, graceful draping |
Denim | Stiff, durable, heavy | Draw sharp, angular folds and add visible stitching |
Leather | Smooth, rigid, reflective | Use minimal folds and add shine to highlight areas |
Wool | Thick, warm, textured | Draw chunky folds and add a slight fuzziness to the surface |
When drawing fabric textures, consider using various techniques such as:
- Crosshatching for rough textures
- Stippling for subtle patterns
- Smooth shading for sleek materials
- Line work for visible weaves or knits
Remember, the key to convincing fabric rendering lies in careful observation. Study how different materials behave in real life, and practice replicating these effects in your drawings.
Credit: Seesaw
Mastering the Basics: Folds, Wrinkles, and Draping
Now that we’ve covered fabric properties, let’s dive into the fundamental elements of clothes drawing: folds, wrinkles, and draping. These features are what bring clothing to life, adding depth, movement, and realism to your illustrations.
Types of Folds
- Pipe Folds: Long, cylindrical folds that often appear on hanging fabric or sleeves.
- Zigzag Folds: Sharp, angular folds commonly seen in pleated skirts or gathered fabric.
- Spiral Folds: Circular folds that radiate outward, often found in twirling skirts or draped fabric.
- Diaper Folds: Diamond-shaped folds that occur when fabric is pinched or gathered at a point.
When drawing folds, consider the following tips:
- Observe how gravity affects the fabric
- Pay attention to the fabric’s weight and stiffness
- Use varying line weights to create depth and dimension
- Study the way light interacts with different fold types
Wrinkles and Creases
Wrinkles and creases add character and realism to clothing illustrations. They occur naturally in areas of movement or tension, such as elbows, knees, and waistlines. To draw convincing wrinkles:
- Use short, irregular lines to create natural-looking creases
- Concentrate wrinkles in areas of tension or compression
- Vary the intensity and frequency of wrinkles based on the fabric type
- Remember that wrinkles often form perpendicular to the direction of stretch
Mastering Draping
Draping is the art of depicting how fabric hangs and falls around the body. It’s crucial for creating flowing garments like dresses, capes, or loose-fitting clothing. To improve your draping skills:
- Start with basic geometric shapes to establish the overall form
- Add folds and wrinkles to create volume and movement
- Pay attention to how the fabric interacts with the body underneath
- Use shading to emphasize the three-dimensionality of the draped fabric
Practice these techniques regularly, and you’ll soon find yourself creating more dynamic and realistic clothing in your drawings.
Credit: Seesaw
Anime Clothes Drawing: Capturing Style and Movement
As an avid fan and illustrator of anime-style art, I’ve found that drawing clothes for anime characters presents unique challenges and opportunities. Anime clothes drawing often emphasizes stylization and exaggeration while still maintaining a sense of realism and functionality.
When approaching anime clothes drawing, consider the following tips:
Emphasize silhouettes: Anime styles often use bold, distinctive silhouettes to define characters. Pay extra attention to the overall shape of the clothing.
Exaggerate movement: Use flowing lines and dynamic folds to convey a sense of motion, even in static poses.
Simplify details: While realism is important, anime styles often simplify complex patterns or textures. Focus on key details that define the garment.
Play with proportions: Anime characters often have exaggerated features, so don’t be afraid to adjust clothing proportions to match the style.
Use line weight variation: Incorporate thick and thin lines to add depth and emphasis to your anime clothes drawings.
One of the most exciting aspects of anime clothes drawing is the opportunity to design unique and fantastical outfits. When creating original designs, consider the character’s personality, role, and the world they inhabit. This approach will help you craft clothing that not only looks great but also enhances the character’s overall design.
Techniques for Drawing Different Types of Clothing
As artists, we often need to depict a wide variety of clothing styles and types. Each garment presents its own challenges and requires specific techniques to render effectively. Let’s explore some common clothing types and tips for drawing them:
1. T-Shirts and Casual Tops
- Focus on the neckline and sleeve cuffs
- Pay attention to how the fabric stretches across the chest and shoulders
- Add subtle wrinkles around areas of movement (armpits, elbows)
2. Jeans and Trousers
- Emphasize seams and pockets
- Draw wrinkles around the knees and ankles
- Consider the fit (skinny, loose, straight-leg) when drawing folds
3. Dresses and Skirts
- Start with the overall silhouette
- Pay attention to how the fabric drapes and flows
- Add details like pleats, gathers, or ruffles as needed
4. Suits and Formal Wear
- Focus on crisp lines and sharp angles
- Pay extra attention to tailoring details (lapels, buttons, pockets)
- Use minimal wrinkles to convey a polished appearance
5. Outerwear (Jackets, Coats)
- Emphasize structure and volume
- Add details like zippers, buttons, and pockets
- Consider layering and how the garment sits over other clothing
When drawing any type of clothing, always start with basic shapes and forms before adding details. This approach will help you maintain proper proportions and overall structure.
Digital vs. Traditional Methods for Drawing Clothes
As someone who has worked extensively with both digital and traditional media, I can attest to the strengths and challenges of each approach when it comes to clothes drawing. Let’s compare the two methods:
Traditional Methods
Pros:
- Tactile experience and direct connection with the medium
- No need for technology or power sources
- Easier to achieve certain textures and effects
Cons:
- Limited undo options
- Can be messy and require more setup/cleanup
- Harder to make major changes or adjustments
Recommended supplies for traditional clothes drawing:
- Graphite pencils (various hardnesses)
- Ink pens or markers
- Colored pencils or watercolors
- Quality paper or sketchbook
- Eraser and blending tools
Digital Methods
Pros:
- Infinite undo and layer options
- Clean workspace and easy storage of work
- Ability to quickly test color schemes and make adjustments
Cons:
- Learning curve for software and hardware
- Potential for technical issues or file corruption
- Can be expensive to get started (tablet, software, etc.)
Recommended tools for digital clothes drawing:
- Drawing tablet (Wacom, Huion, or iPad Pro)
- Software (Photoshop, Clip Studio Paint, or Procreate)
- Customized brushes for different fabric textures
- Reference image library
Ultimately, the choice between digital and traditional methods comes down to personal preference and the specific requirements of your project. Many artists, myself included, often combine both approaches to leverage the strengths of each method.
Developing Your Own Style in Clothes Drawing
As you progress in your clothes drawing journey, you’ll naturally begin to develop your own unique style. This personal flair is what sets your work apart and makes it recognizable. Here are some tips to help you cultivate your individual approach to clothes drawing:
Study diverse styles: Expose yourself to a wide range of artistic styles, from realistic fashion illustrations to stylized cartoon designs. This broad exposure will help you identify elements that resonate with you.
Experiment with different techniques: Try various methods of rendering fabric, folds, and textures. Mix and match approaches until you find combinations that feel natural and expressive to you.
Draw inspiration from unexpected sources: Look beyond fashion and art for inspiration. Architecture, nature, and even abstract concepts can inform your clothing designs in unique ways.
Practice consistently: Regular practice is key to developing and refining your style. Set aside time each day for clothes drawing exercises.
Embrace imperfections: Don’t be afraid of quirks or “mistakes” in your work. Often, these unique elements become defining features of your style.
Seek feedback: Share your work with other artists and be open to constructive criticism. Outside perspectives can help you identify strengths to emphasize and areas for improvement.
Analyze your favorite pieces: Look at your own work objectively. What do you like about your best drawings? How can you incorporate those elements more consistently?
Remember, developing a personal style is an ongoing process. Be patient with yourself and enjoy the journey of artistic growth and discovery.
![](https://bujoart.com/wp-content/uploads/2025/02/bujoart3.jpg)
Credit: Seesaw