Introduction to Food Drawing: A Feast for the Eyes
Your drawings can be a feast for the eyes, enticing viewers with their vibrant colors and intricate details. The beauty of food drawing lies not only in the subject matter but also in the variety of styles you can adopt. You can choose from realistic depictions to whimsical interpretations, allowing your personality to shine through your art. Whether you’re sketching a luscious fruit basket or a gourmet dish, the possibilities are endless, and your creativity will flourish as you explore different techniques.
As you embark on your food drawing journey, it’s essential to recognize the importance of practice. Much like cooking, mastering food illustration takes time, patience, and dedication. By honing your skills and experimenting with various tools and methods, you will gradually develop your unique artistic voice. Let’s dive into the essential tools and techniques that will set you on the path to food drawing success.
Essential Tools for Food Drawing Success
To create stunning food illustrations, you need the right set of tools. Here’s a breakdown of the essential items every food artist should have in their toolkit:
- Pencils and Erasers: Start with a variety of graphite pencils ranging from 2H to 6B for different shading techniques. A good quality eraser will help you correct mistakes and create highlights.
- Paper: Choose paper that suits your medium; for dry mediums like pencil and charcoal, a smooth surface is ideal. For watercolor or ink, consider heavier, textured paper.
- Inks and Pens: Fine-tipped pens and brush pens can add detail and depth to your drawings. Experiment with different ink types, including waterproof and non-waterproof options, for varied effects.
- Coloring Tools: Whether you prefer colored pencils, markers, or watercolors, having a palette of colors allows you to bring your food illustrations to life. Don’t forget about blending tools like stumps or brushes for smooth transitions.
- Digital Tools: If you’re inclined towards digital art, investing in a drawing tablet and software like Procreate or Adobe Illustrator can enhance your creativity.
Each tool plays a critical role in your artistic process. As you gather these essentials, remember that the most important tool is your imagination. Don’t be afraid to experiment with different techniques and find what works best for you.
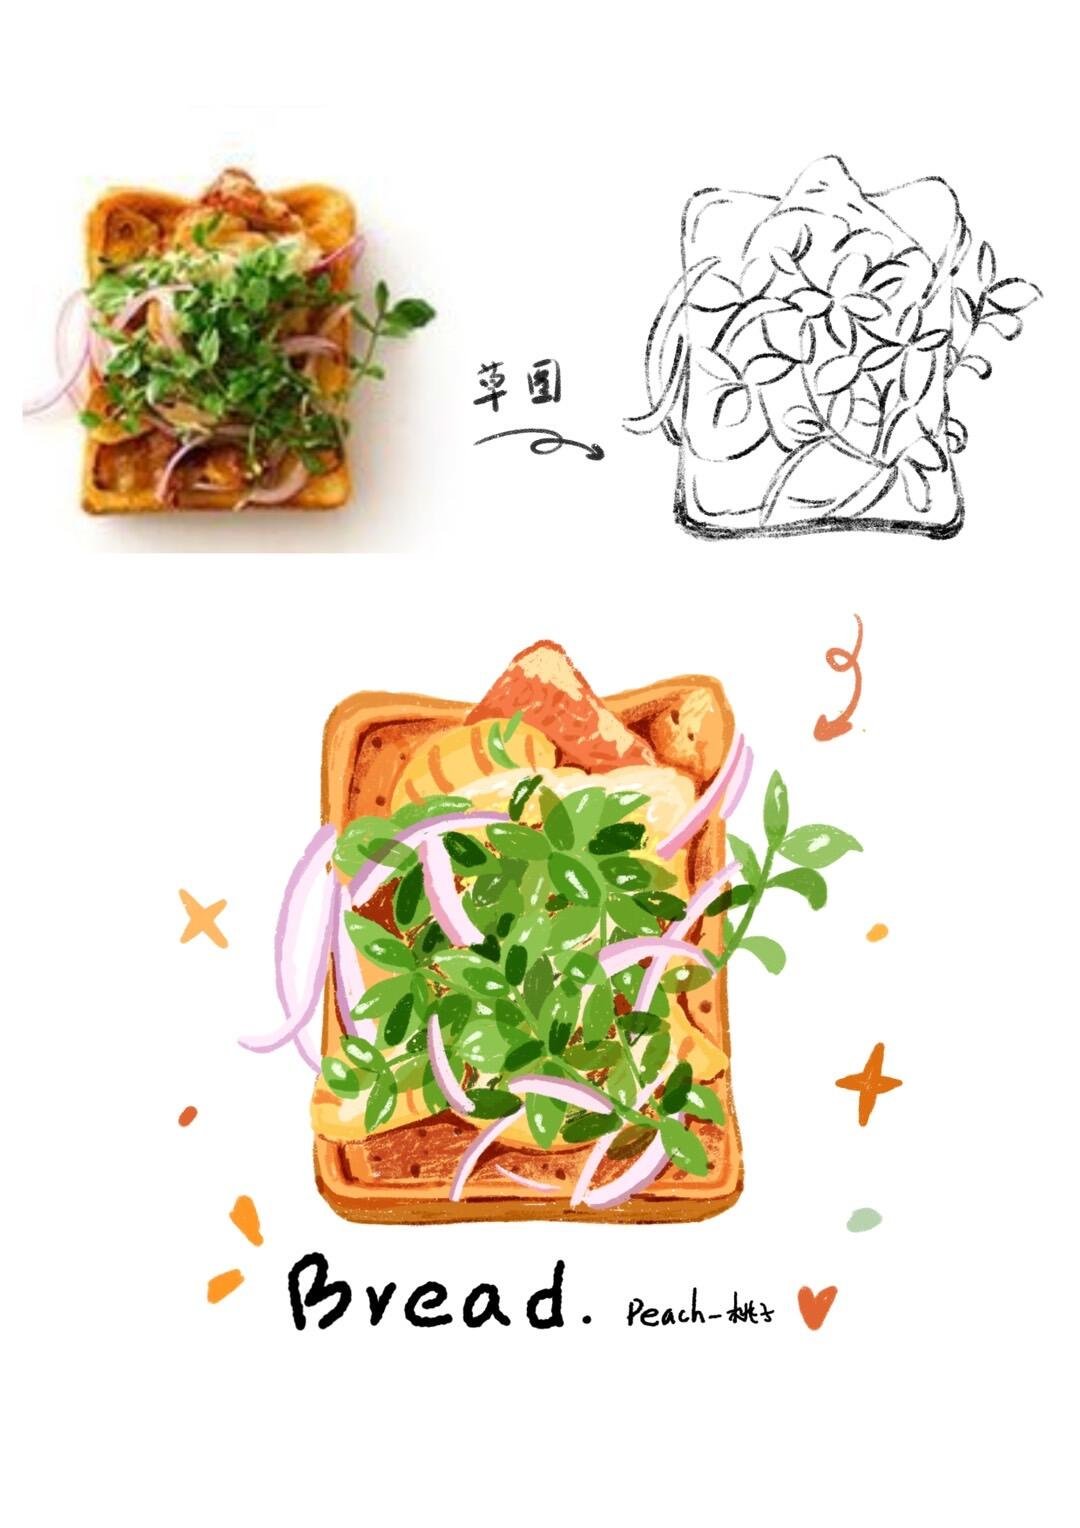
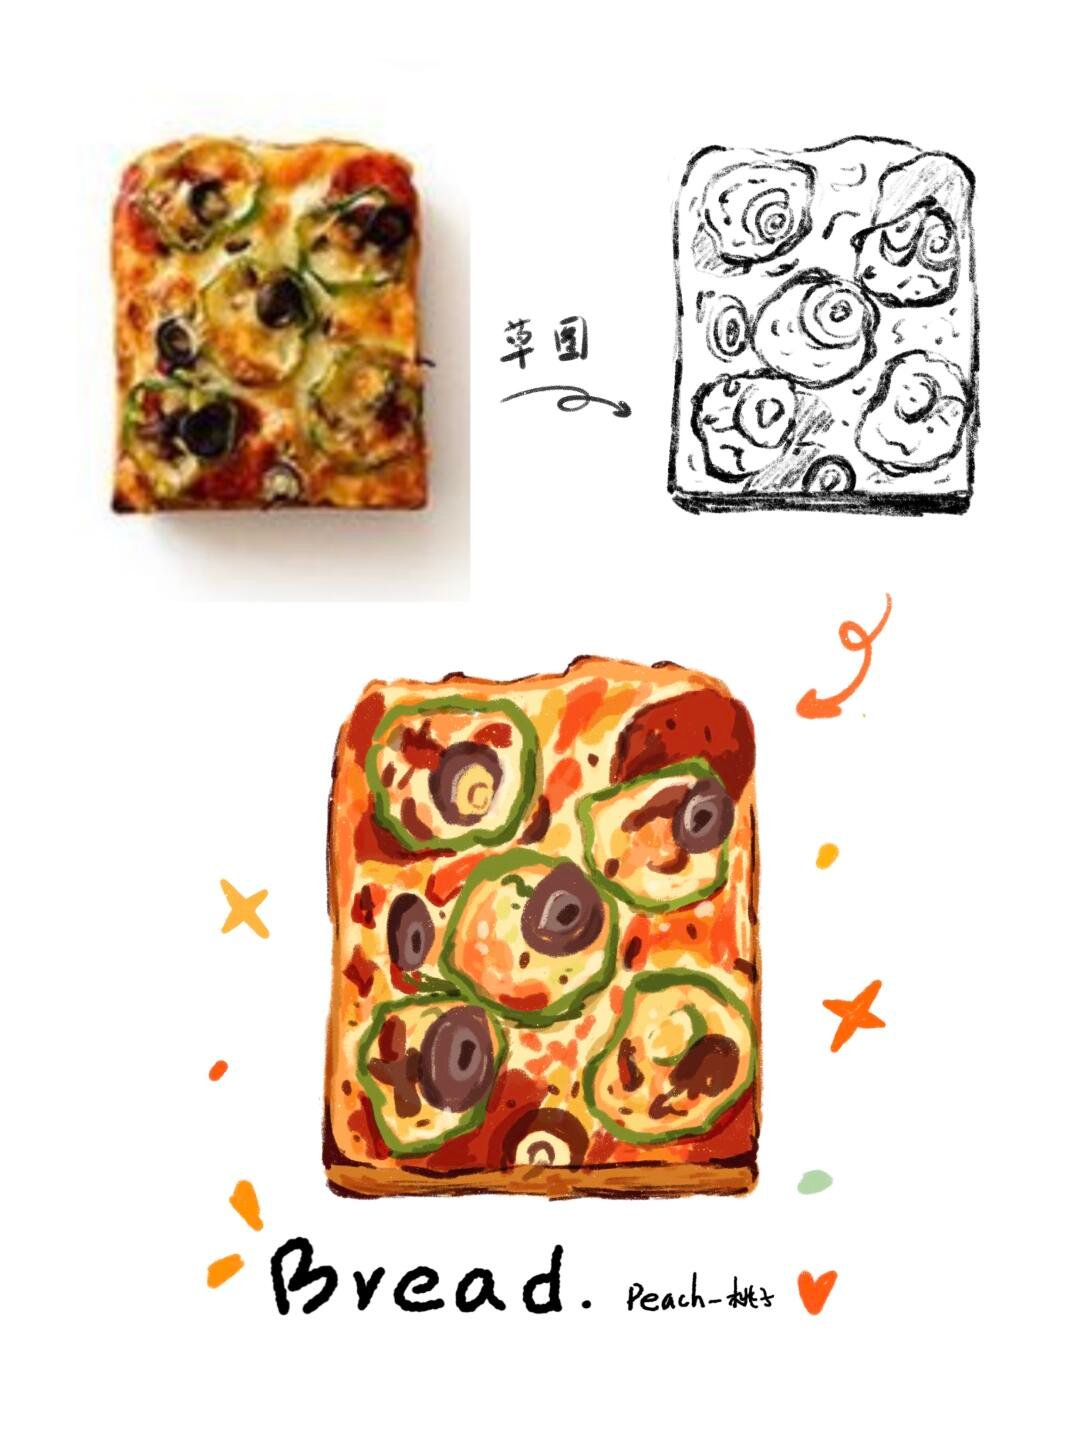

Credit: Peach-桃子
Mastering Basic Shapes: The Foundation of Food Illustration
Before diving into detailed food drawings, it’s crucial to master basic shapes. Every food item can be broken down into simple geometric forms, which serve as the foundation of your illustration. For example, a round apple can be simplified into a sphere, while a rectangular loaf of bread can be viewed as a box.
- Practice Basic Shapes: Start by sketching basic shapes such as circles, squares, and triangles. Once you’re comfortable, move on to more complex forms like cylinders and ovals. This practice will help you visualize food items more accurately.
- Combine Shapes: As you gain confidence, begin combining shapes to create your desired food items. A cupcake, for instance, can be depicted as a cone (the icing) on top of a cylinder (the base). This technique will make it easier for you to construct complicated drawings.
- Use Guidelines: When sketching, utilize light guidelines to maintain proportionality. These can be erased later, but they will help you keep your shapes aligned and accurate.
Mastering these fundamental shapes will provide you with a solid framework for your food drawings. As you continue to practice, you will find that your ability to capture the essence of food becomes more intuitive and effortless.


Credit: Peach-桃子
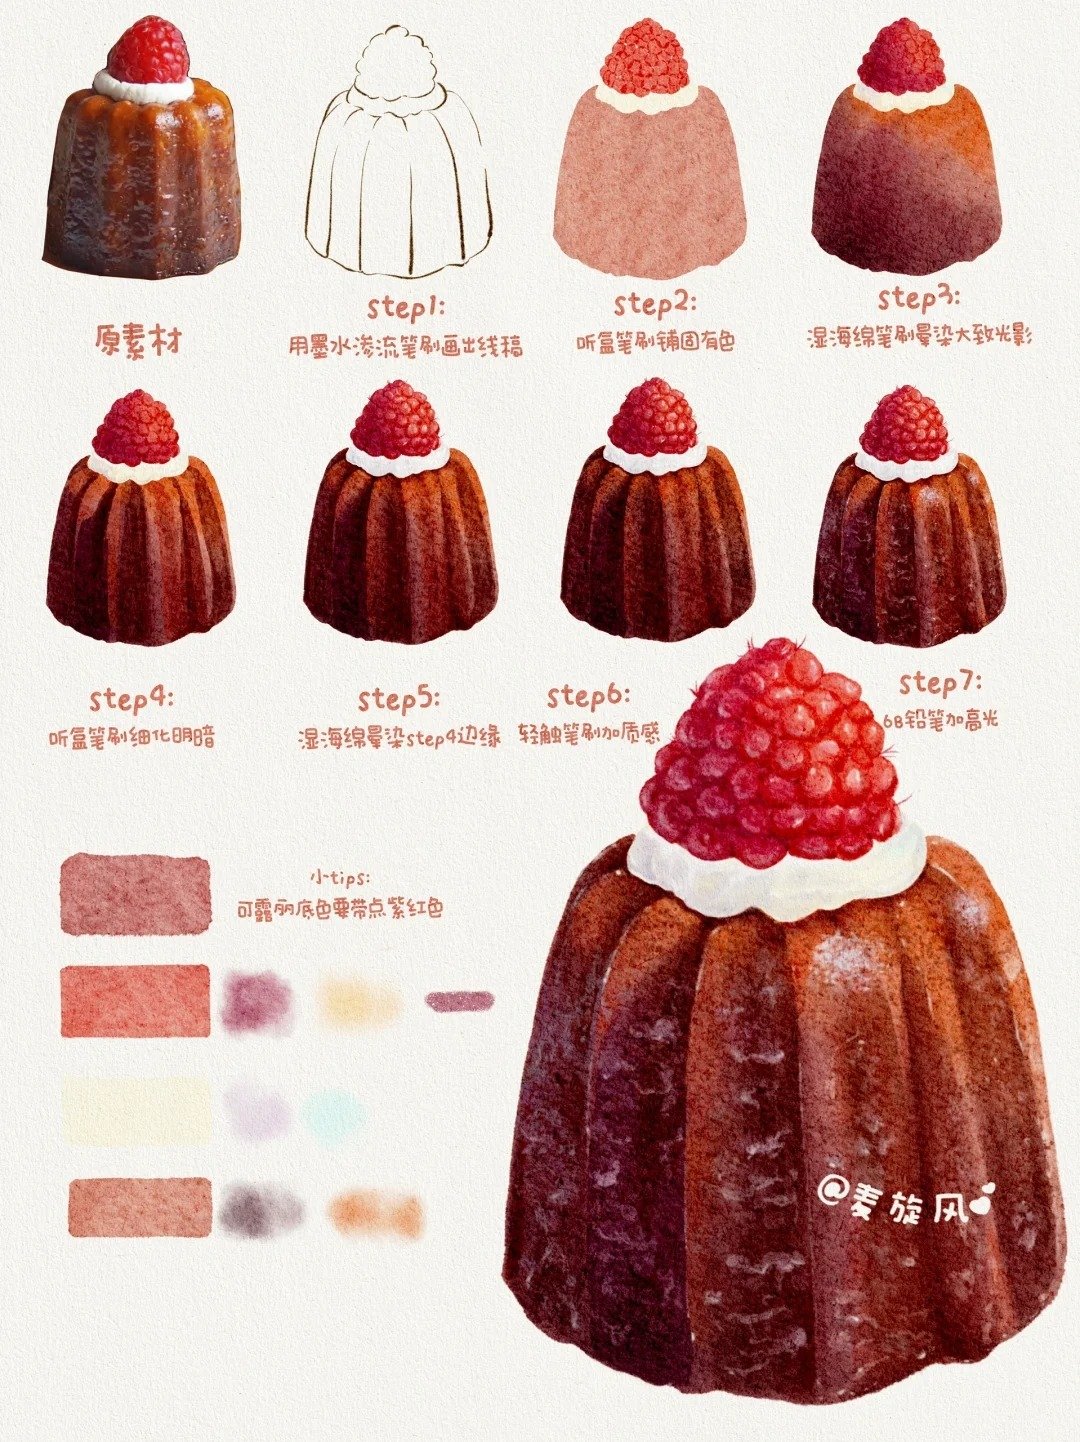
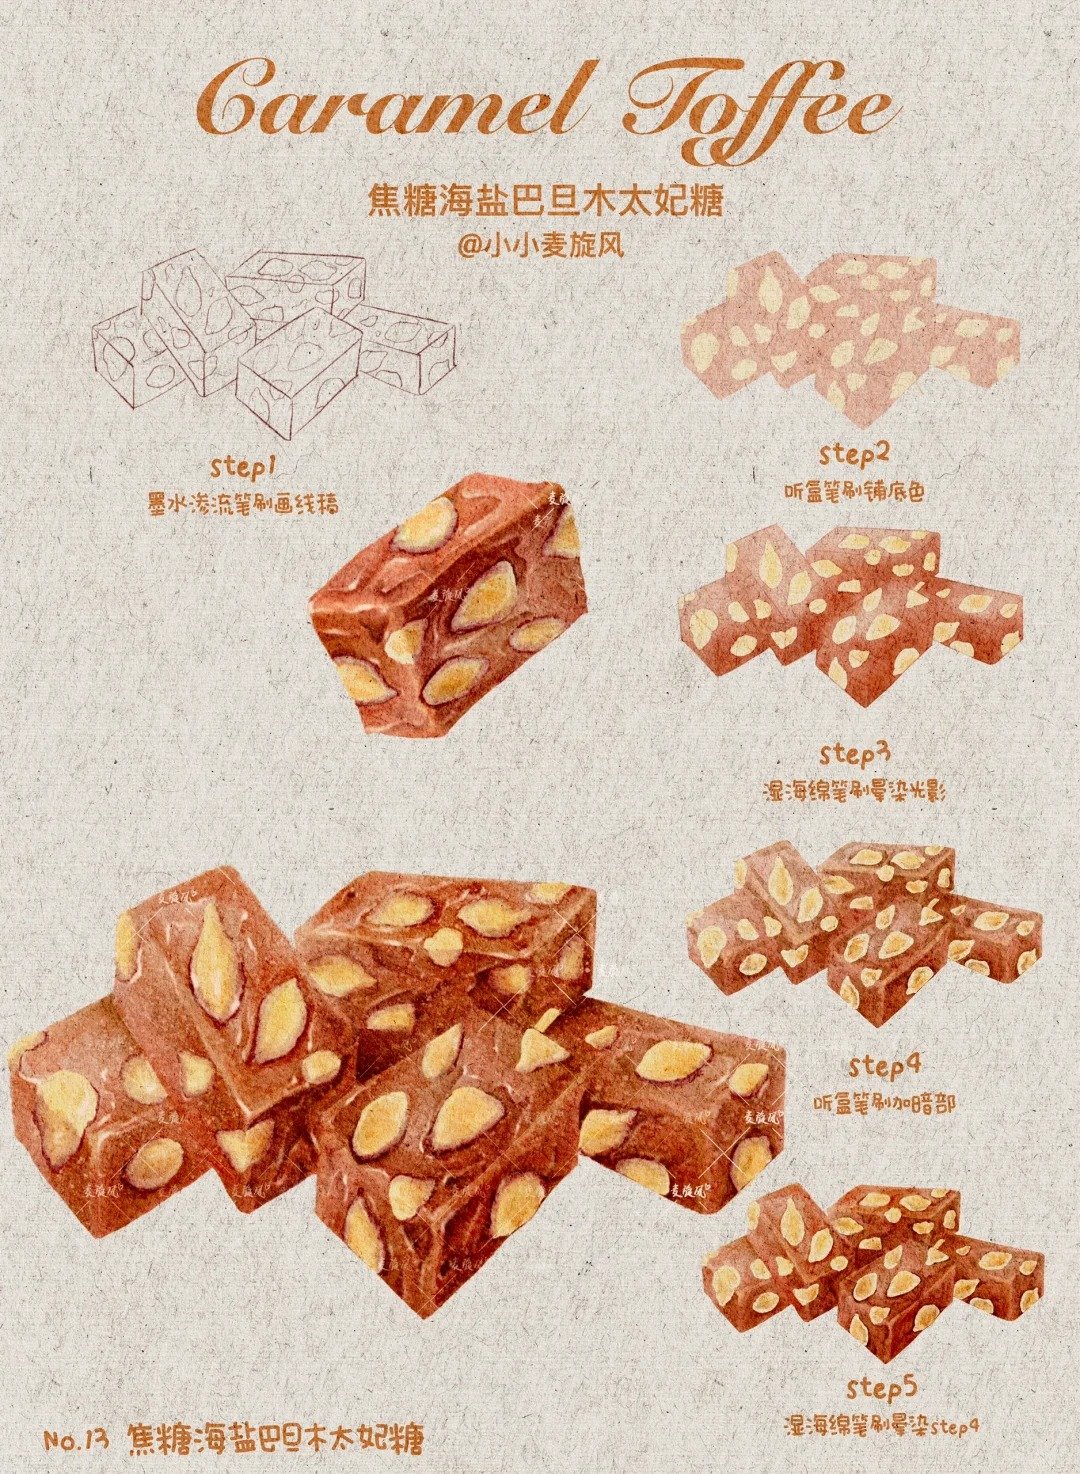
Techniques for Capturing Texture in Food Drawing
Texture is essential in food drawing, as it enhances the realism and appeal of your illustrations. There are various techniques you can employ to convey the tactile quality of different foods:
- Cross-Hatching: This technique involves creating a series of parallel lines that intersect to build texture and depth. Use different spacing and line thickness to suggest variations in texture, such as the roughness of bread crust or the smoothness of chocolate.
- Stippling: By applying tiny dots in varying densities, you can create a range of textures. This method works particularly well for items like grains, fruits, and vegetables, where subtlety is key.
- Blending: Employ blending tools, like tortillons or your fingers, to soften edges and create smooth transitions. This technique is especially useful for capturing the creamy texture of frosting or the juiciness of ripe fruit.
- Layering: Build up texture by layering different mediums. For example, sketch a base layer in pencil, add color with markers, and finish with highlights using gel pens. This approach will create a rich, multi-dimensional effect in your food drawings.
By incorporating these techniques, you will enhance the visual interest of your illustrations, making them more appealing and engaging to your audience.


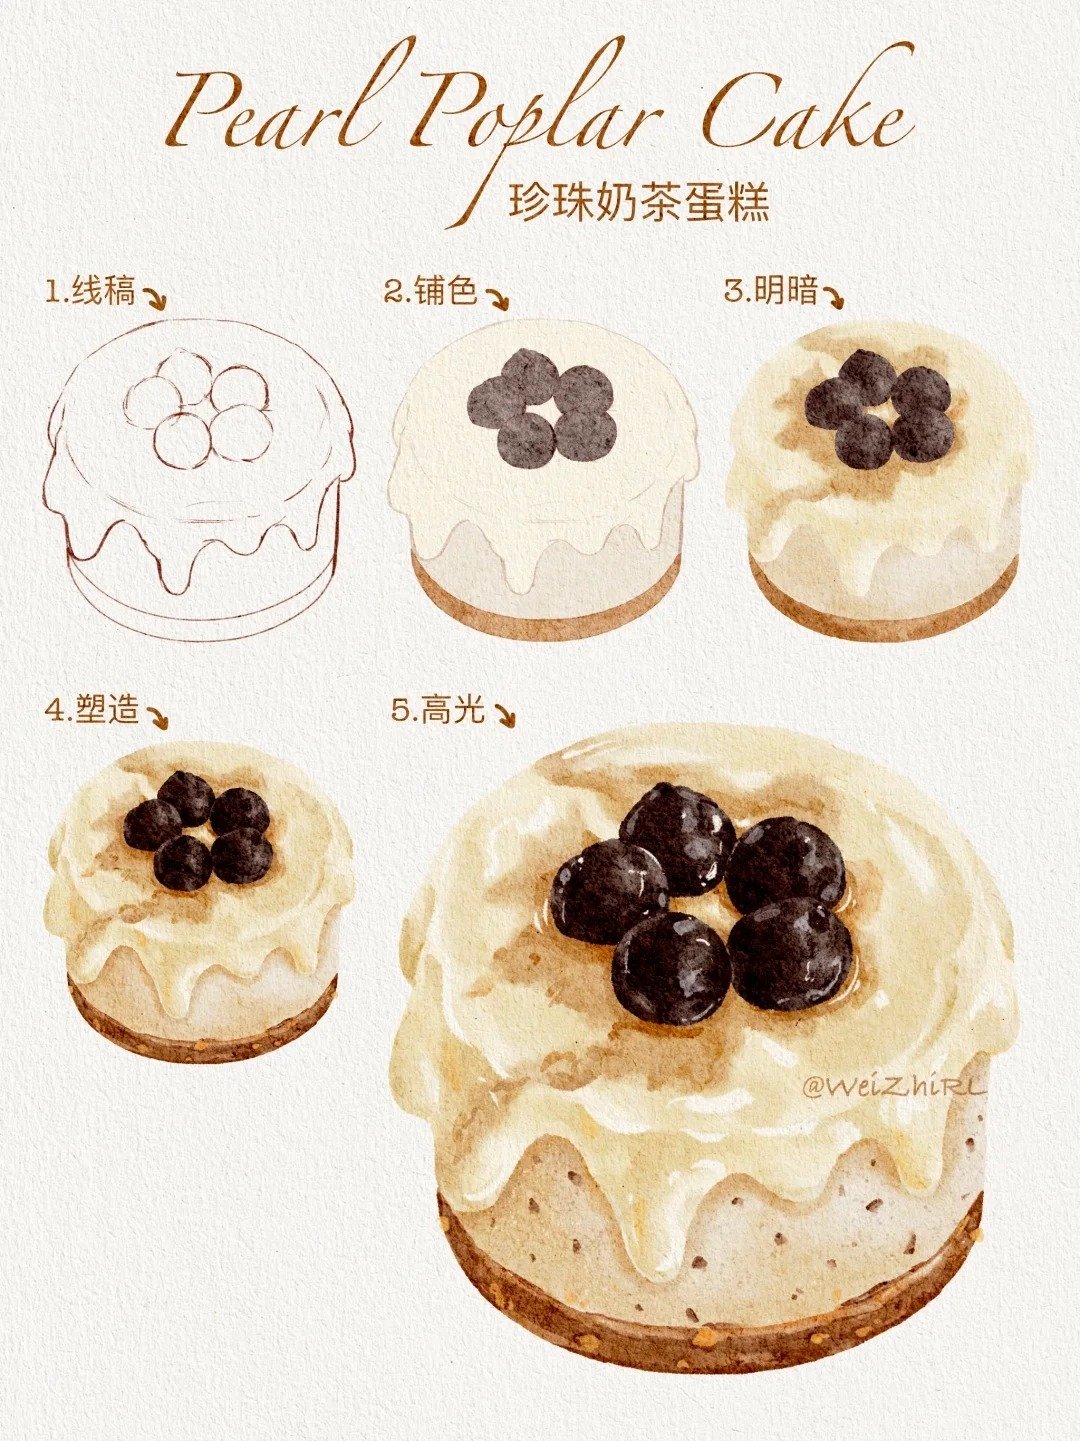
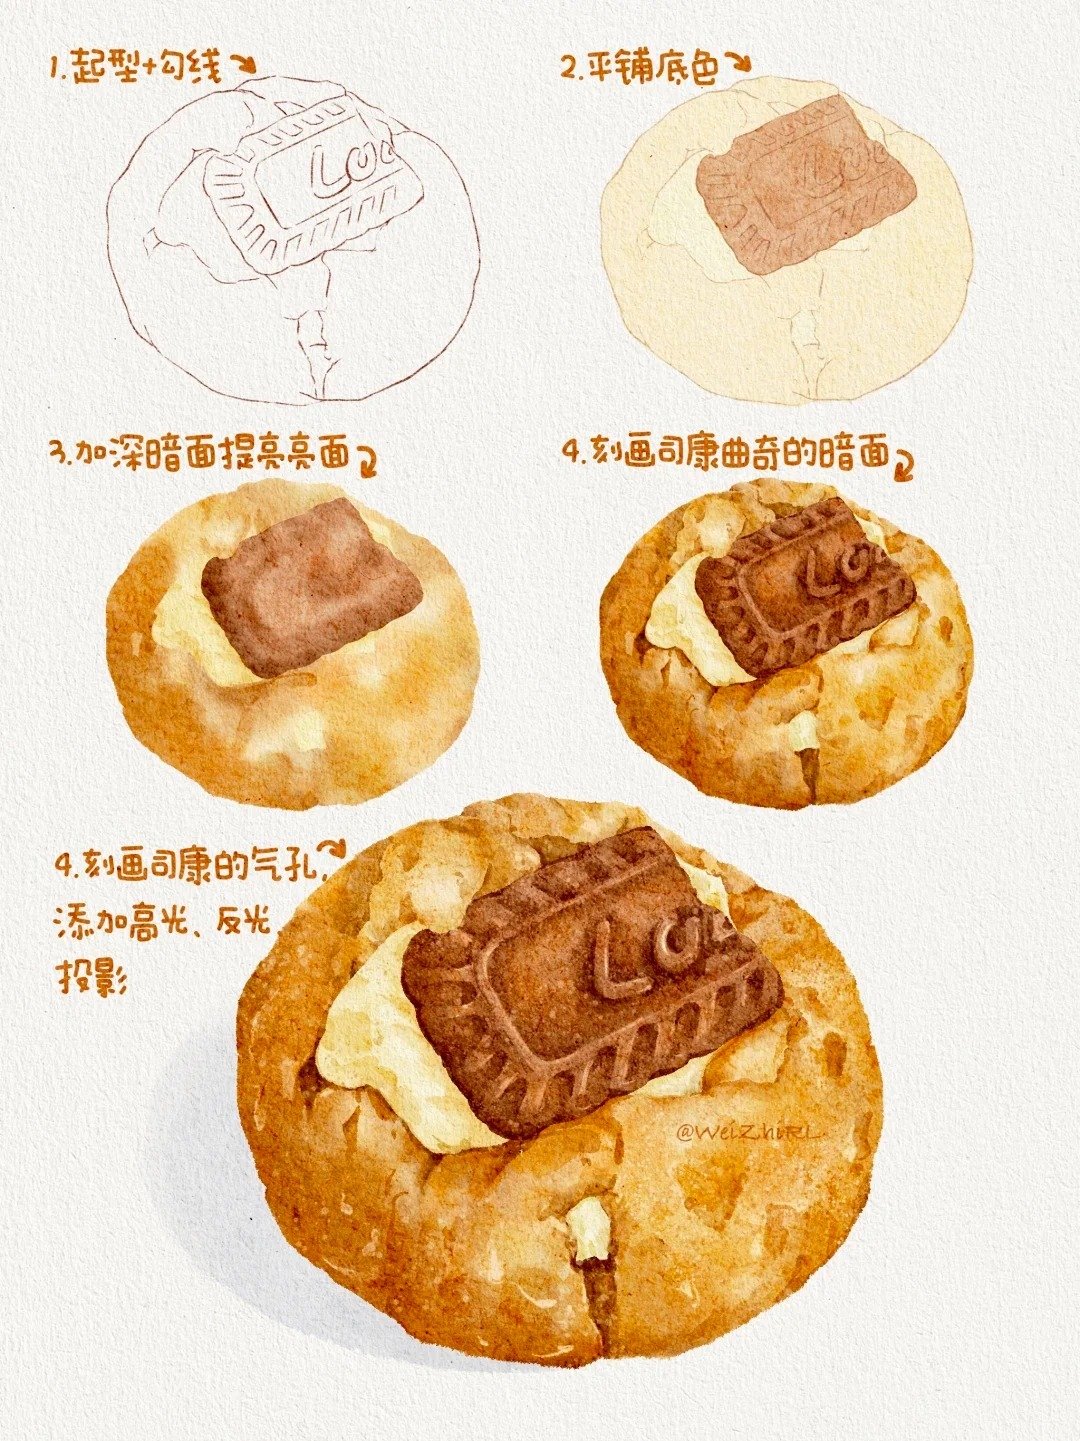
Credit: 未知人嘞
Color Theory in Food Illustration: Making Your Drawings Pop
Understanding color theory is essential for creating vibrant and appealing food illustrations. The way colors interact can significantly impact the overall mood and appeal of your artwork. Here are some key concepts to consider:
- Color Wheel: Familiarize yourself with the color wheel, which consists of primary, secondary, and tertiary colors. Understanding these relationships will help you create harmonious color schemes in your artworks.
- Warm and Cool Colors: Warm colors (reds, oranges, yellows) evoke feelings of excitement and energy, while cool colors (blues, greens, purples) tend to be calming. Consider the emotional impact you want your food drawing to convey when choosing your color palette.
- Contrast and Complementation: Use contrasting colors to create visual interest and highlight specific areas of your drawing. Complementary colors (colors opposite each other on the color wheel) can also enhance the vibrancy of your illustrations.
- Shading and Highlights: Incorporate shading and highlights to add depth to your food drawings. Consider the light source and how it affects the colors in your illustration. This technique will bring your artwork to life and create a three-dimensional effect.
By applying these color theory principles, you will elevate your food illustrations, making them not only visually striking but also inviting and engaging to your audience.


Credit: 未知人嘞
Easy Food Drawing Ideas for Beginners
If you’re just starting your food drawing journey, it’s helpful to begin with simple concepts that can build your confidence. Here are some easy food drawing ideas that cater to beginners:
- Fruits: Start with basic shapes by drawing individual fruits like apples, bananas, or strawberries. Focus on capturing their colors and textures, and don’t hesitate to experiment with different perspectives.
- Vegetables: Draw simple vegetables like carrots, peppers, or cucumbers. These items allow you to practice texture and shading, as they often have varied surfaces.
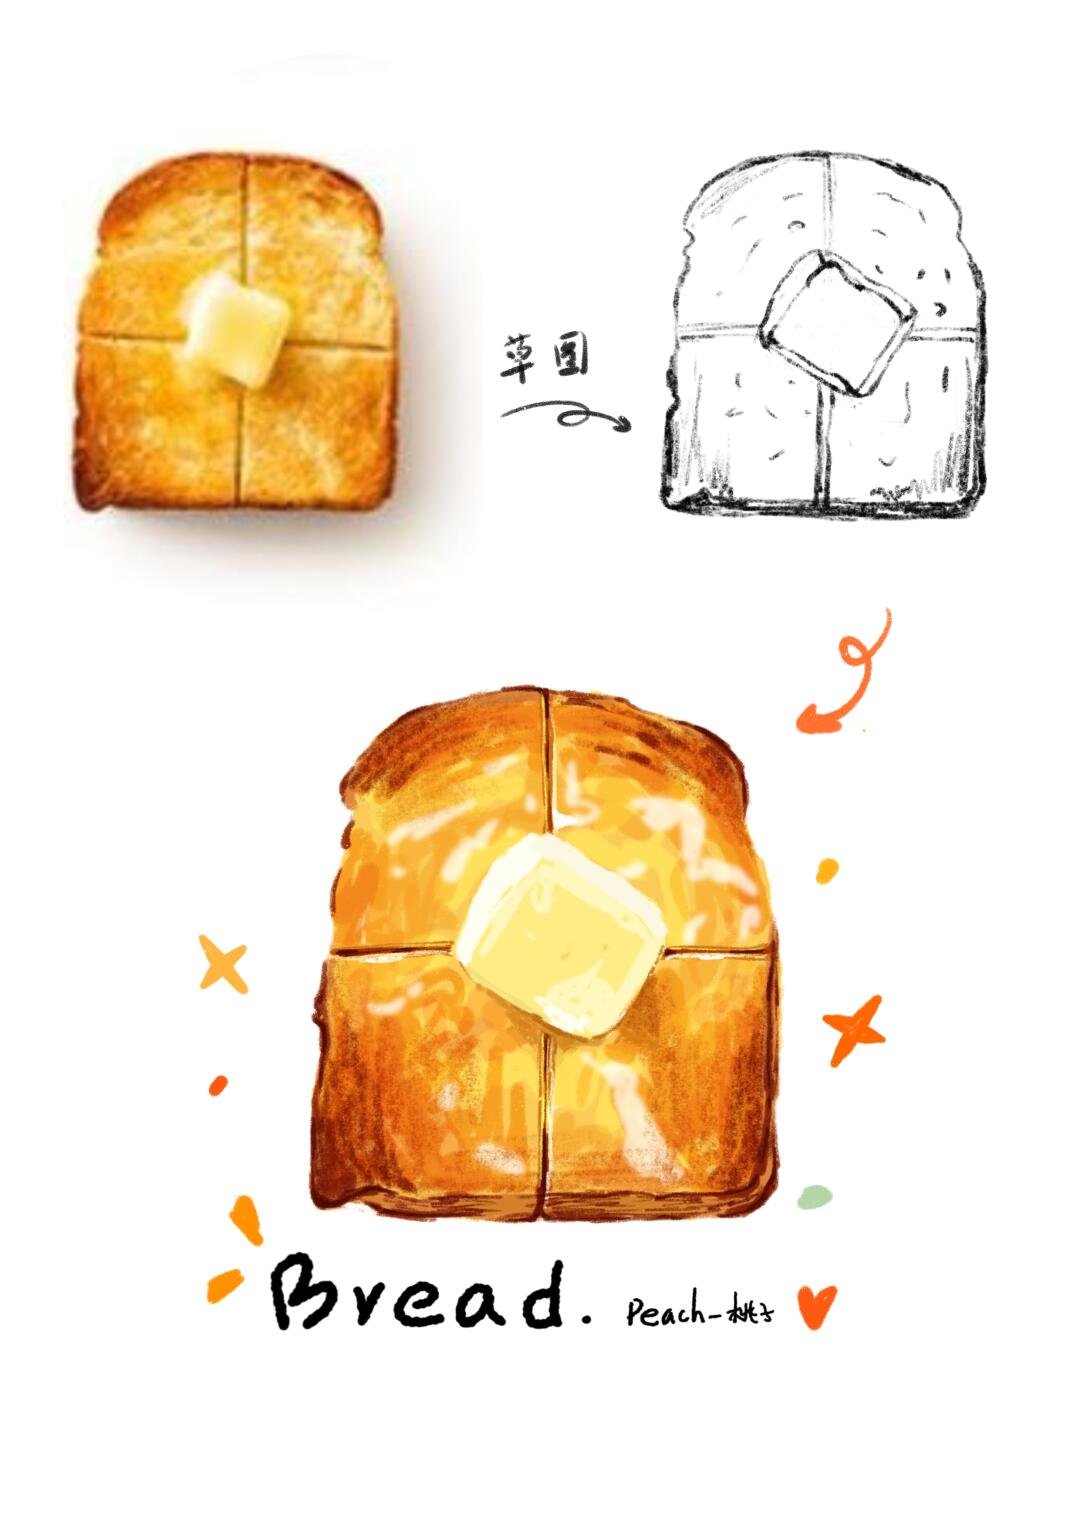
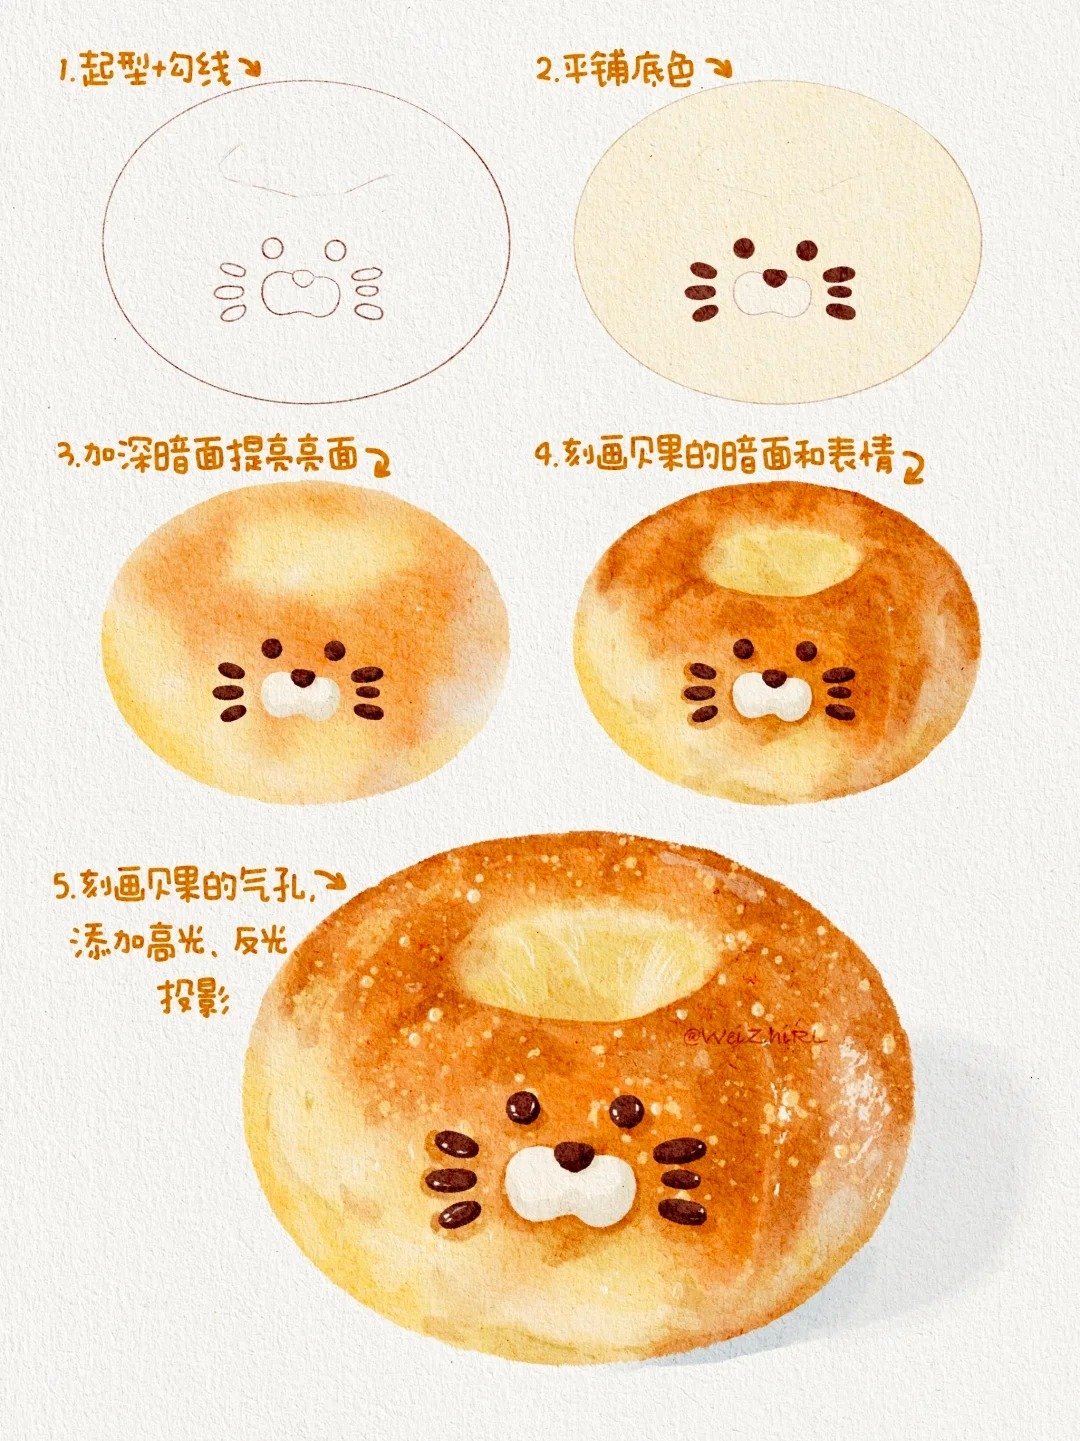
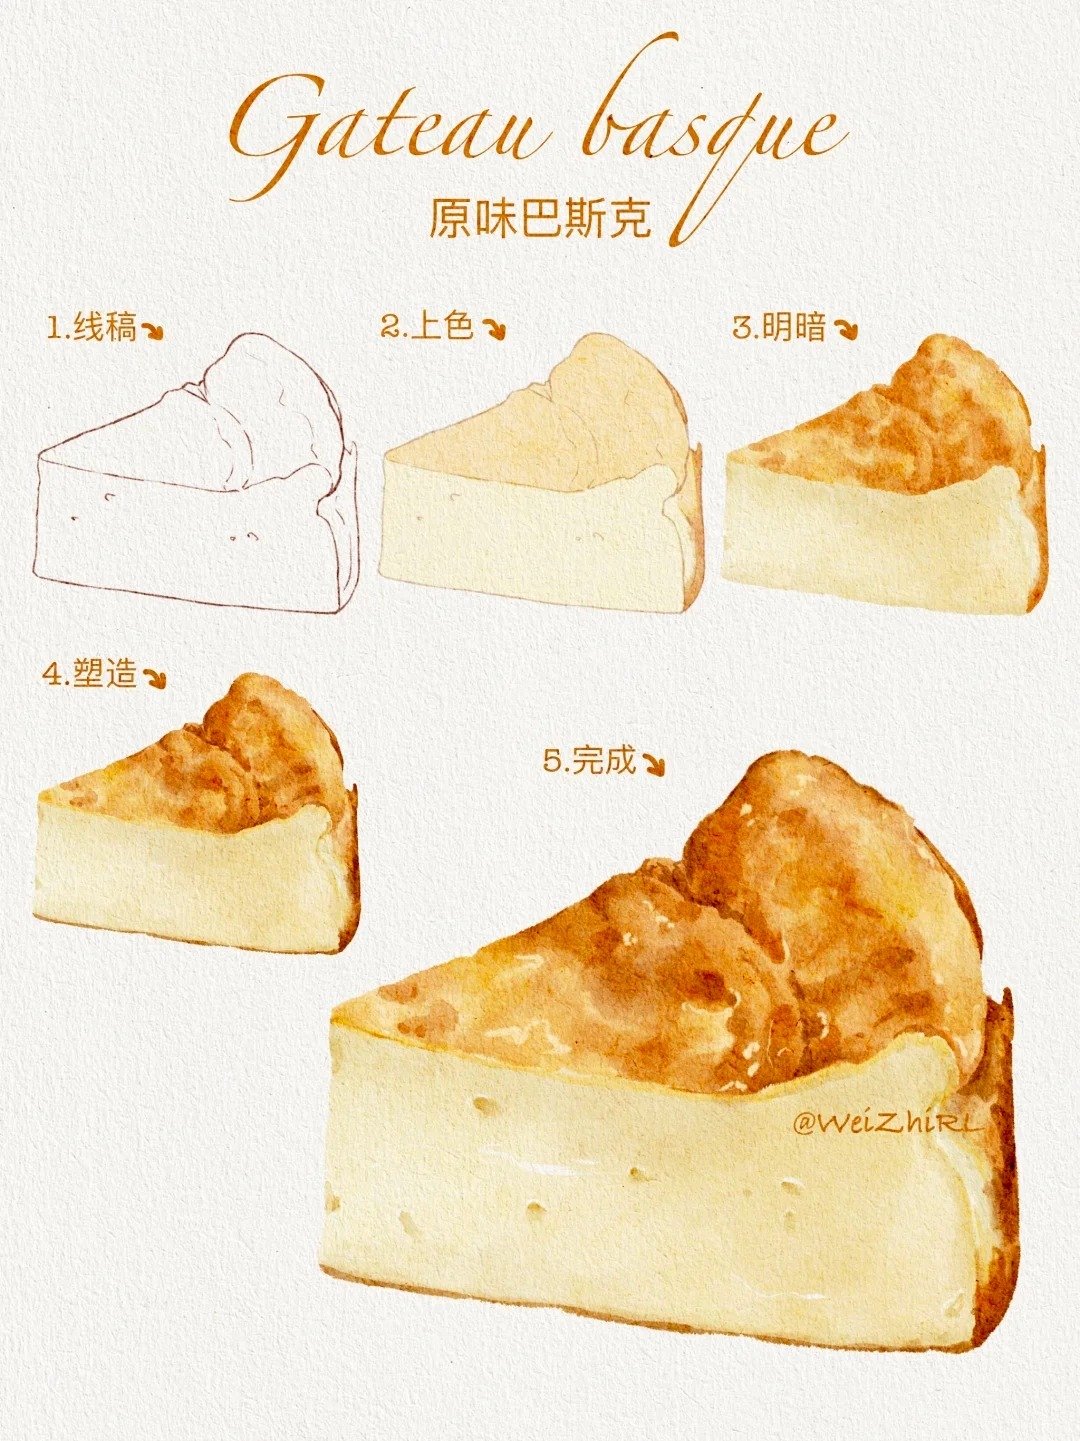
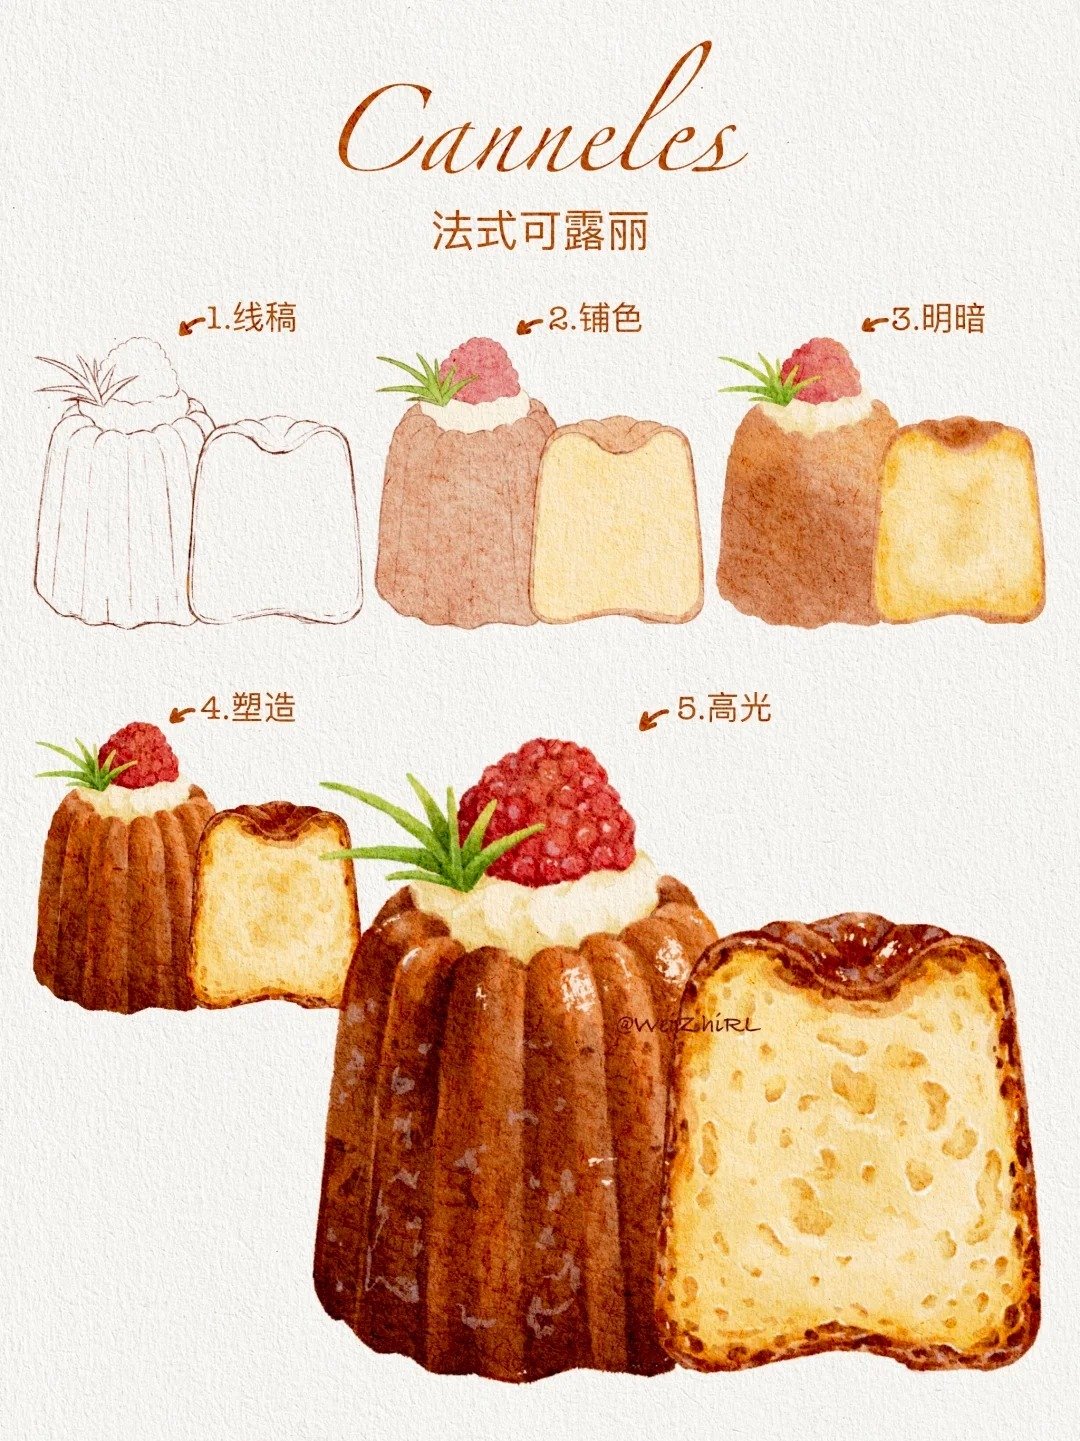
- Baked Goods: Illustrate simple baked items such as cookies, cupcakes, or loaves of bread. Their shapes lend themselves well to beginners, and you can play with colors and textures to enhance your drawings.
- Beverages: Create illustrations of drinks like smoothies, coffee cups, or juices. Pay attention to the glass shape and how light interacts with the liquid.
By starting with these easy food drawing ideas, you will gradually build your skills and gain confidence to tackle more complex subjects. Remember, practice is key, and each drawing will contribute to your growth as an artist.


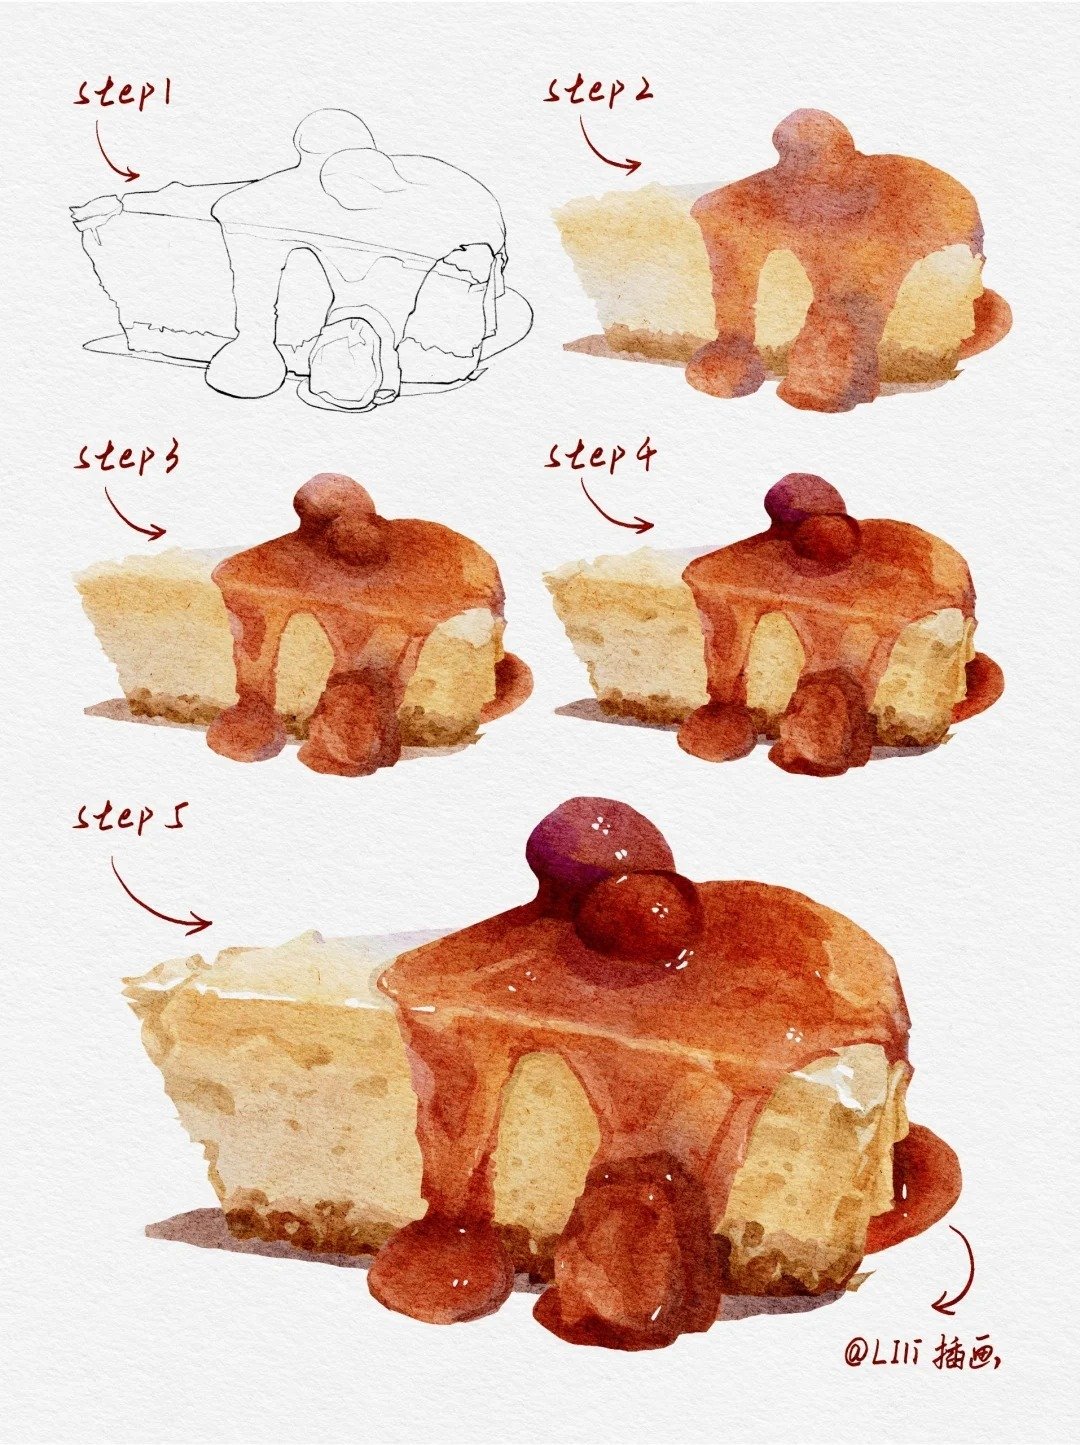
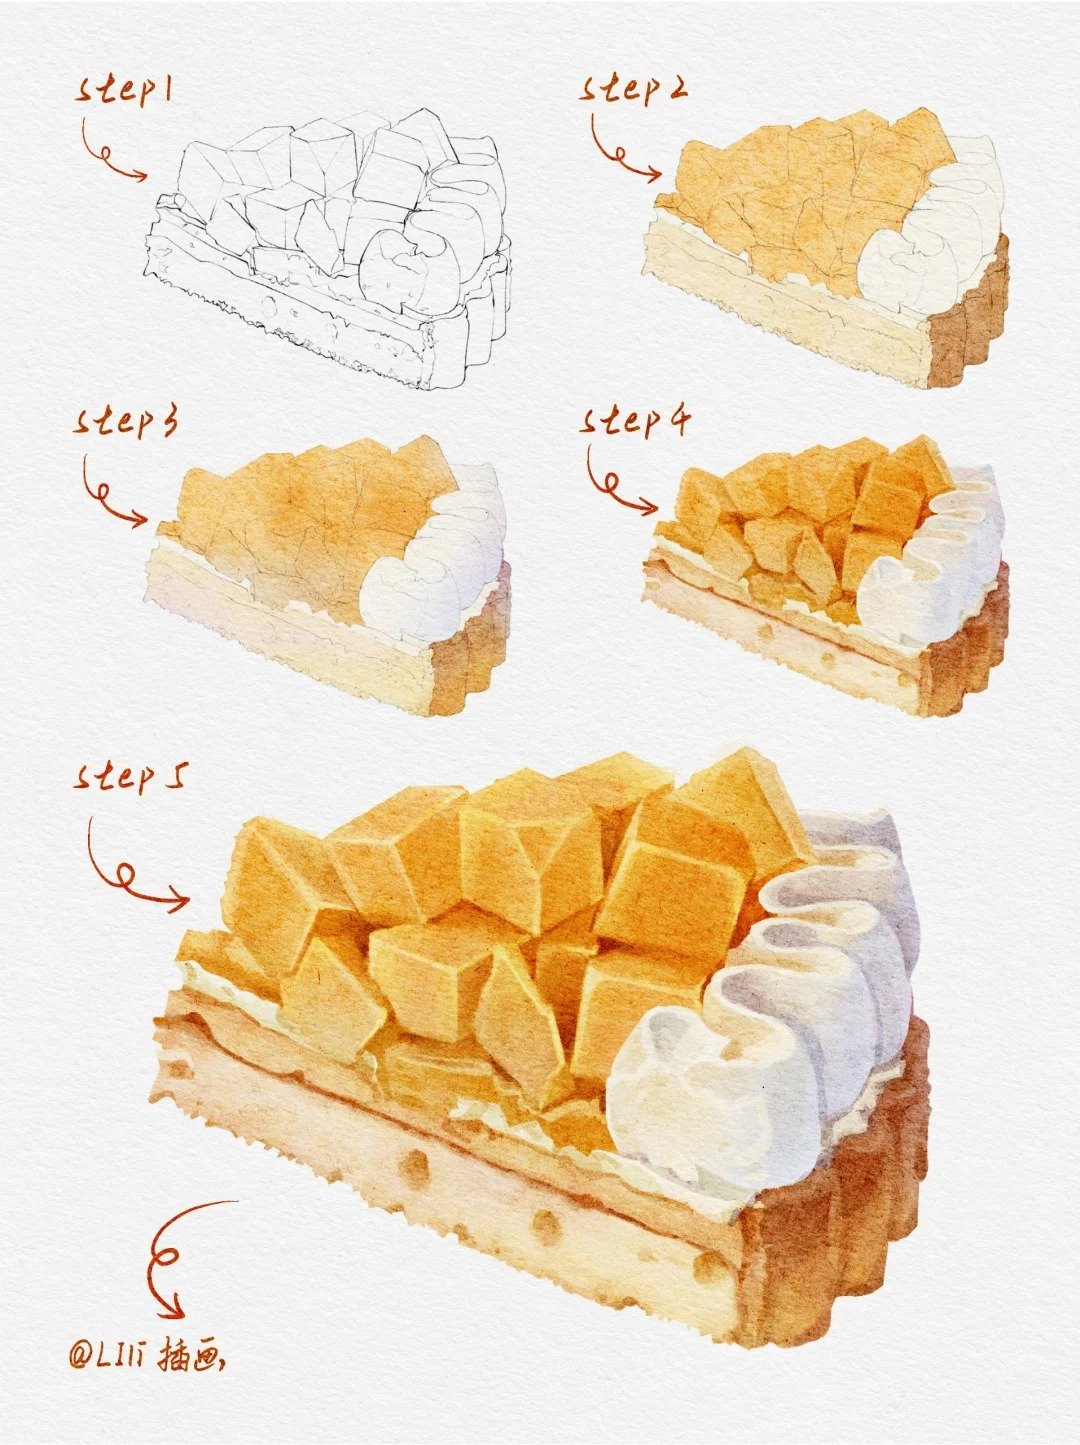
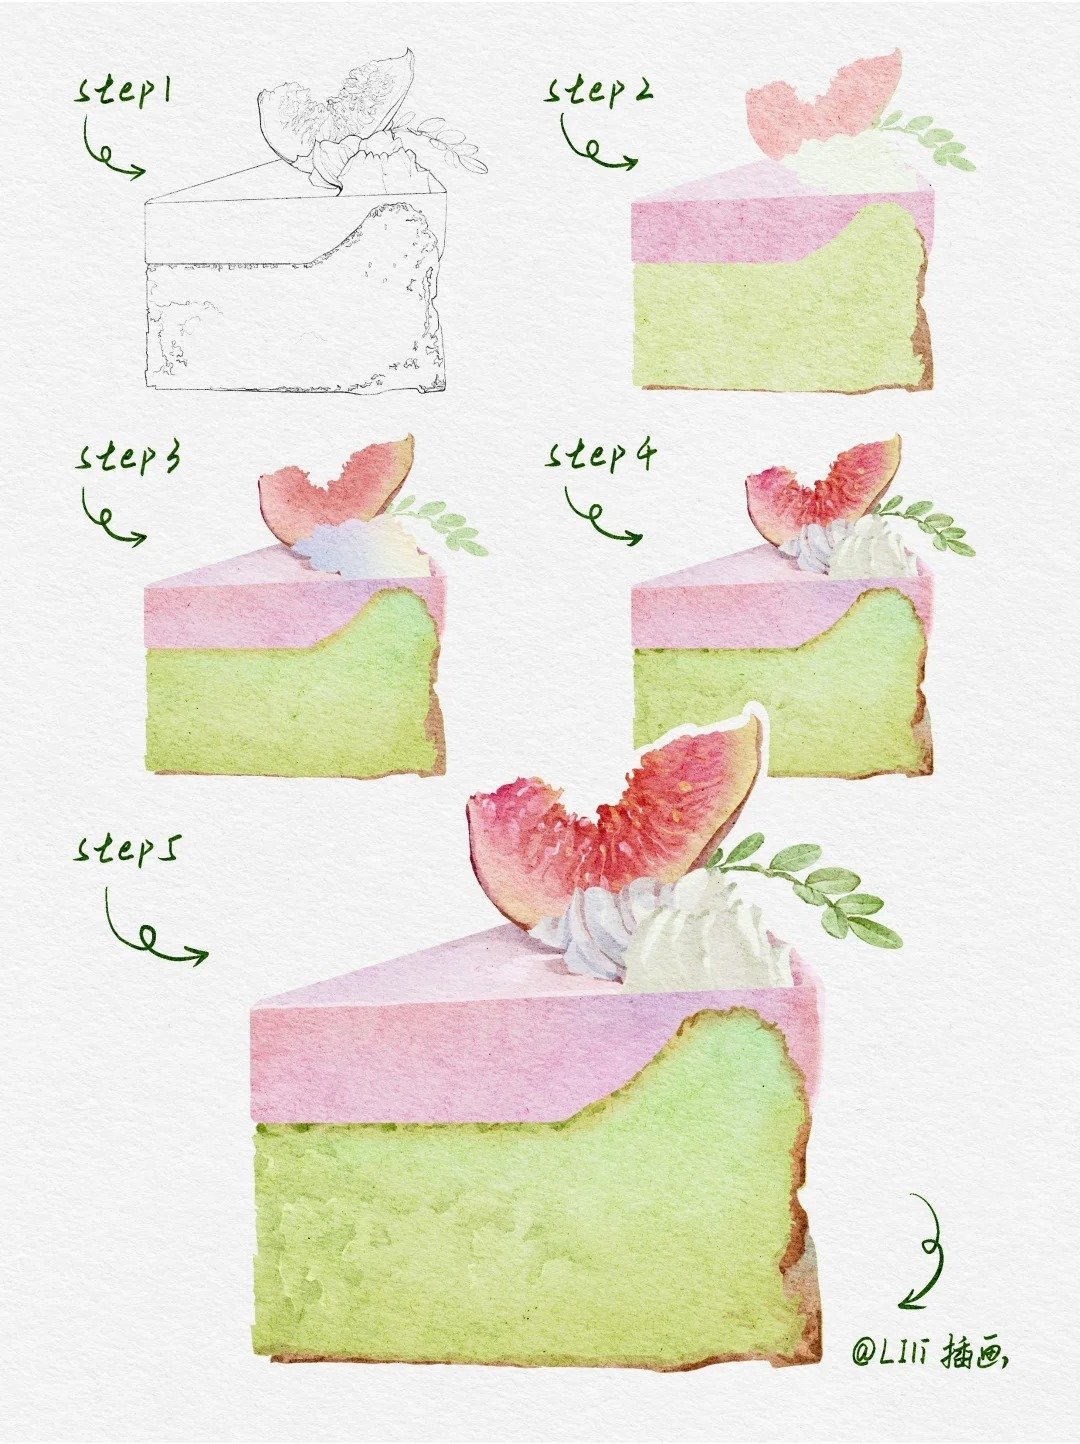

Credit: Lili插画
Advanced Techniques for Realistic Food Drawings
Once you’ve mastered the basics of food drawing, you may want to explore advanced techniques for achieving realism. Here are some methods to elevate your skills:
- Observational Drawing: Spend time drawing from real-life objects. Set up a still life with various food items and focus on capturing their proportions, colors, and textures. This practice will enhance your observation skills and improve your realism.
- Reflections and Shadows: Pay attention to how light interacts with food items. Use shading techniques to create realistic shadows and highlights, which will add depth to your drawings. Reflections, especially in shiny surfaces like glass or glazes, can enhance the realism of your artwork.
- Detailed Textures: Spend time observing the intricate details of food items. Focus on the grain of wood in a cutting board, the bubbles in a glass of soda, or the frosting on a cake. Capture these details in your illustrations to create a more lifelike representation.
- Dynamic Composition: Consider the arrangement of your food items within the drawing. A dynamic composition can create visual interest and draw the viewer in. Experiment with different angles and perspectives to find the most engaging layout for your artwork.
By implementing these advanced techniques, you’ll be able to create food drawings that resonate with authenticity and captivate your audience.


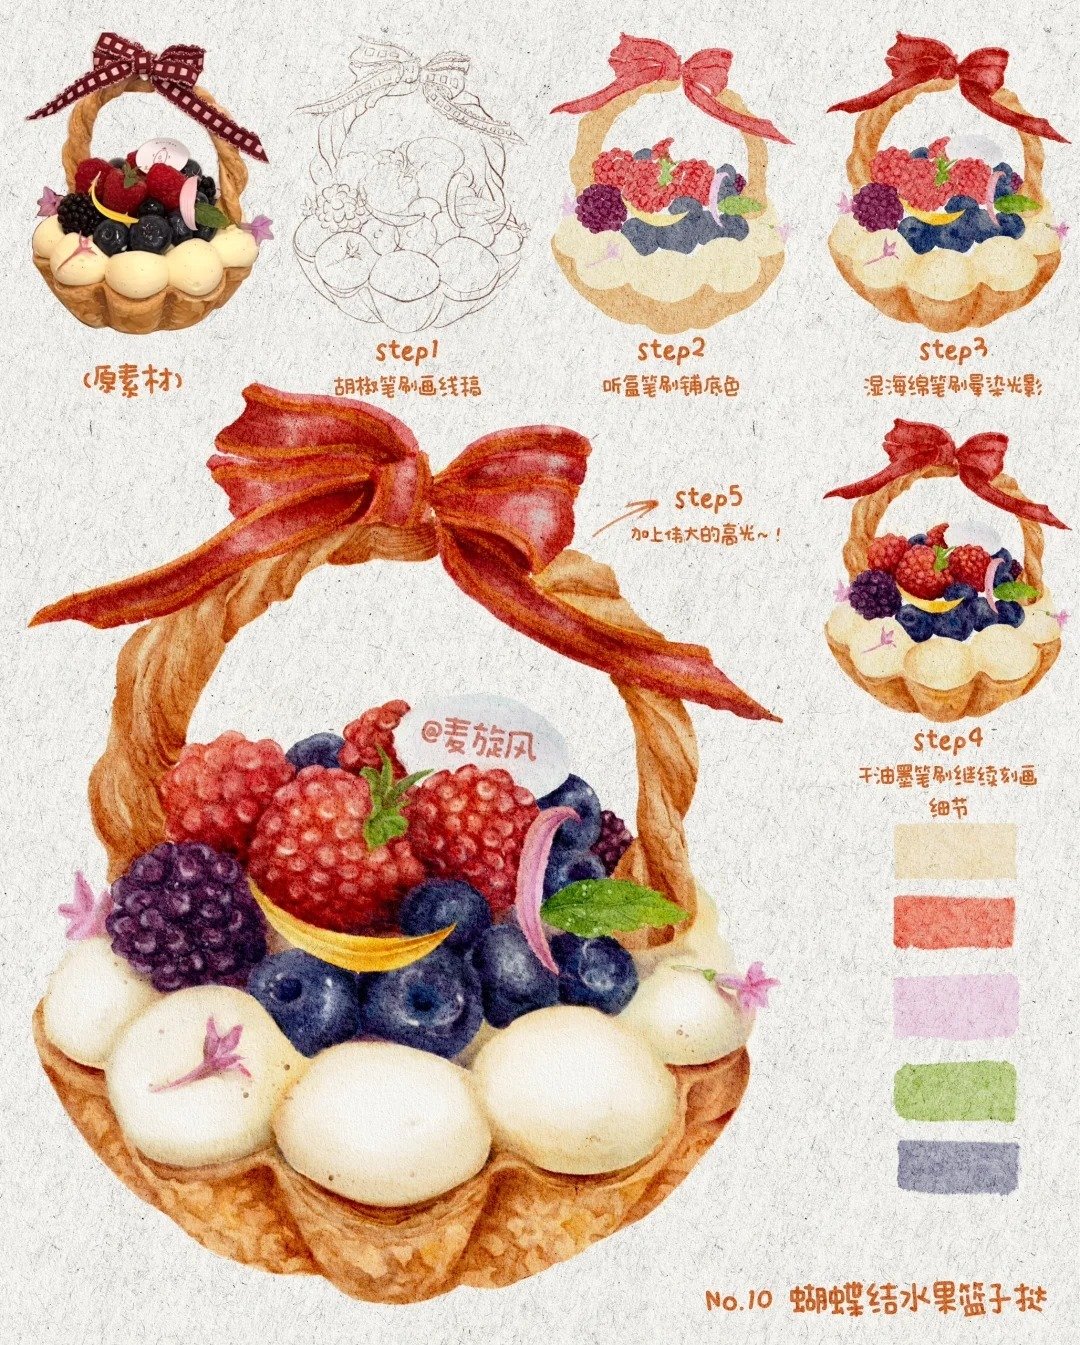
Credit: 炫个麦旋风
Composition Tips for Appetizing Food Drawings
Composition plays a vital role in the effectiveness of your food drawings. A well-composed piece can draw the viewer’s eye and enhance the overall appeal of your artwork. Here are some composition tips to create mouthwatering food illustrations:
- Rule of Thirds: Divide your canvas into a grid of nine equal parts, and place your focal point along the intersecting lines. This technique creates balance and helps guide the viewer’s eye through the drawing.
- Leading Lines: Use natural lines within the composition to lead the viewer’s eye toward the focal point. These can be the edges of a table, the curves of food items, or the arrangement of utensils.
- Varied Perspectives: Experiment with different angles when composing your food drawings. Bird’s-eye views, close-ups, or side views can provide unique perspectives that make your artwork more engaging.
- Negative Space: Don’t be afraid to leave areas of the drawing empty. Negative space can create balance, enhance the focus on your subject, and make your composition more appealing.
By applying these composition tips, your food illustrations will become more dynamic, inviting, and visually captivating.
From Sketch to Plate: Creating a Complete Food Drawing
The process of transitioning from a sketch to a completed food drawing involves several important steps:
- Initial Sketch: Begin by lightly sketching the basic shapes and outlines of your food item. Focus on proportions and placement, allowing room for adjustments as you work.
- Refining Details: Once you’re satisfied with your initial sketch, start refining the details. Add texture, shading, and other elements that will enhance the realism of your drawing.
- Incorporating Color: After finalizing the details, begin applying color to your drawing. Use layering techniques to build depth and vibrancy, ensuring that the colors reflect the true essence of the food item.
- Final Touches: As you conclude your illustration, add highlights and shadows to emphasize the three-dimensional aspects. This will lend a polished finish to your artwork.
- Presentation: Consider how you want to present your food drawing. Whether it’s for a portfolio, social media, or an exhibition, thoughtful presentation can enhance the impact of your artwork.
By following these steps, you’ll effectively transform your sketches into stunning food illustrations that showcase your artistic skills.
Common Challenges in Food Drawing and How to Overcome Them
Every artist faces challenges along their creative journey, and food drawing is no exception. Here are some common obstacles you might encounter and ways to overcome them:
- Proportionality Issues: Getting the proportions right can be daunting. To combat this, practice observational drawing by sketching from real life. Use grid techniques or measuring tools to maintain accuracy.
- Lack of Inspiration: Creative blocks can hinder your progress. To overcome this, immerse yourself in food-related media—cookbooks, food photography, or cooking shows can spark ideas and inspire your artwork.
- Texture Representation: Capturing texture can be tricky. Focus on studying the textures of various food items closely. Practice different techniques like cross-hatching or stippling to find what works best for you.
- Color Matching: Achieving the right color can be challenging. Use a color wheel to understand color relationships, and practice mixing colors to create the desired shades.
Embracing these challenges as part of your artistic growth will ultimately lead to improvement. Remember that perseverance and practice are key to becoming a skilled food illustrator.
Developing Your Unique Food Drawing Style
As you progress in your food drawing journey, you’ll naturally develop your unique style. Here are some tips to help you cultivate your artistic voice:
- Experiment with Techniques: Try various drawing techniques and styles to see what resonates with you. Experimentation can lead to unexpected discoveries that define your personal style.
- Incorporate Influences: Look at the work of other artists, both within and outside the food illustration realm. Analyze their styles and techniques, and consider how you can incorporate elements into your own work.
- Create a Signature Element: Consider integrating a signature element into your illustrations, such as a particular color scheme, pattern, or style of shading. This element can help create a cohesive body of work that reflects your individuality.
- Stay Authentic: Above all, stay true to yourself and your artistic vision. Your unique perspective and experiences will shape your art, so embrace them as you develop your style.
By nurturing your unique food drawing style, you will create artwork that is not only visually appealing but also a true reflection of who you are as an artist.
Food Drawing as a Professional Career: Opportunities and Challenges
Food drawing can transform from a passionate hobby into a professional career. However, it comes with its own set of opportunities and challenges. Here’s what you need to know:
Opportunities
- Freelance Work: Many businesses, including restaurants and food companies, seek illustrators for menus, promotional materials, and packaging designs. Building a strong portfolio can open doors to freelance opportunities.
- Social Media: Platforms like Instagram and Pinterest are powerful tools for showcasing your work. Sharing your food illustrations can attract potential clients and create a following.
- Publishing: Illustrators are often needed for cookbooks, food magazines, and blogs. Collaborating with authors or food writers can lead to fulfilling projects.
Challenges
- Competition: The art market can be competitive, so it’s essential to differentiate yourself and create a niche. Focusing on your unique style and voice will help set you apart.
- Finding Clients: Networking and building relationships within the industry are crucial for finding clients. Attend art shows, workshops, and food events to connect with potential collaborators.
- Maintaining Creativity: As a professional, you may encounter creative blocks or pressure to produce work on demand. Ensuring you set aside time for personal projects can help maintain your passion.
By understanding the opportunities and challenges in the food drawing profession, you can navigate your career path effectively and find success in this rewarding field.
Conclusion: Nourishing Your Artistic Journey in Food Drawing
Embarking on a journey in food drawing offers endless opportunities for creativity and self-expression. By utilizing the essential tools and techniques outlined in this article, you can cultivate your skills and develop your unique style. Remember that practice is key; the more you draw, the more confident and skilled you will become.
As you continue to explore this vibrant art form, embrace the challenges and triumphs along the way. Your passion for food and art can lead to incredible creations that not only satisfy your creative cravings but also inspire others. Whether you pursue food drawing as a hobby or a professional career, let your artistic journey be as fulfilling as the delicious subjects you depict.
Ready to take your food drawing skills to the next level? Start practicing today, and don’t hesitate to share your progress with the world. Your artistic journey awaits!